The Boy Who Bakes

Edd Kimber
  • Home
  • Recipes
  • My Books
  • Blog
  • Recipe Index
  • About
  • Home
  • Recipes
  • My Books
  • Blog
  • Recipe Index
  • About

Recipes

  • All
  • baking
  • Biscuits and Cookies
  • Breads and Quickbreads
  • Bundts
  • Cakes
  • Chocolate
  • Dessert
  • drinks
  • Holidays
  • Pastry
  • Scones and Quickbreads
Pimms (7 of 7).jpg

No-Bake Pimm's Strawberry Cheesecake Tarts

Edd Kimber June 25, 2018

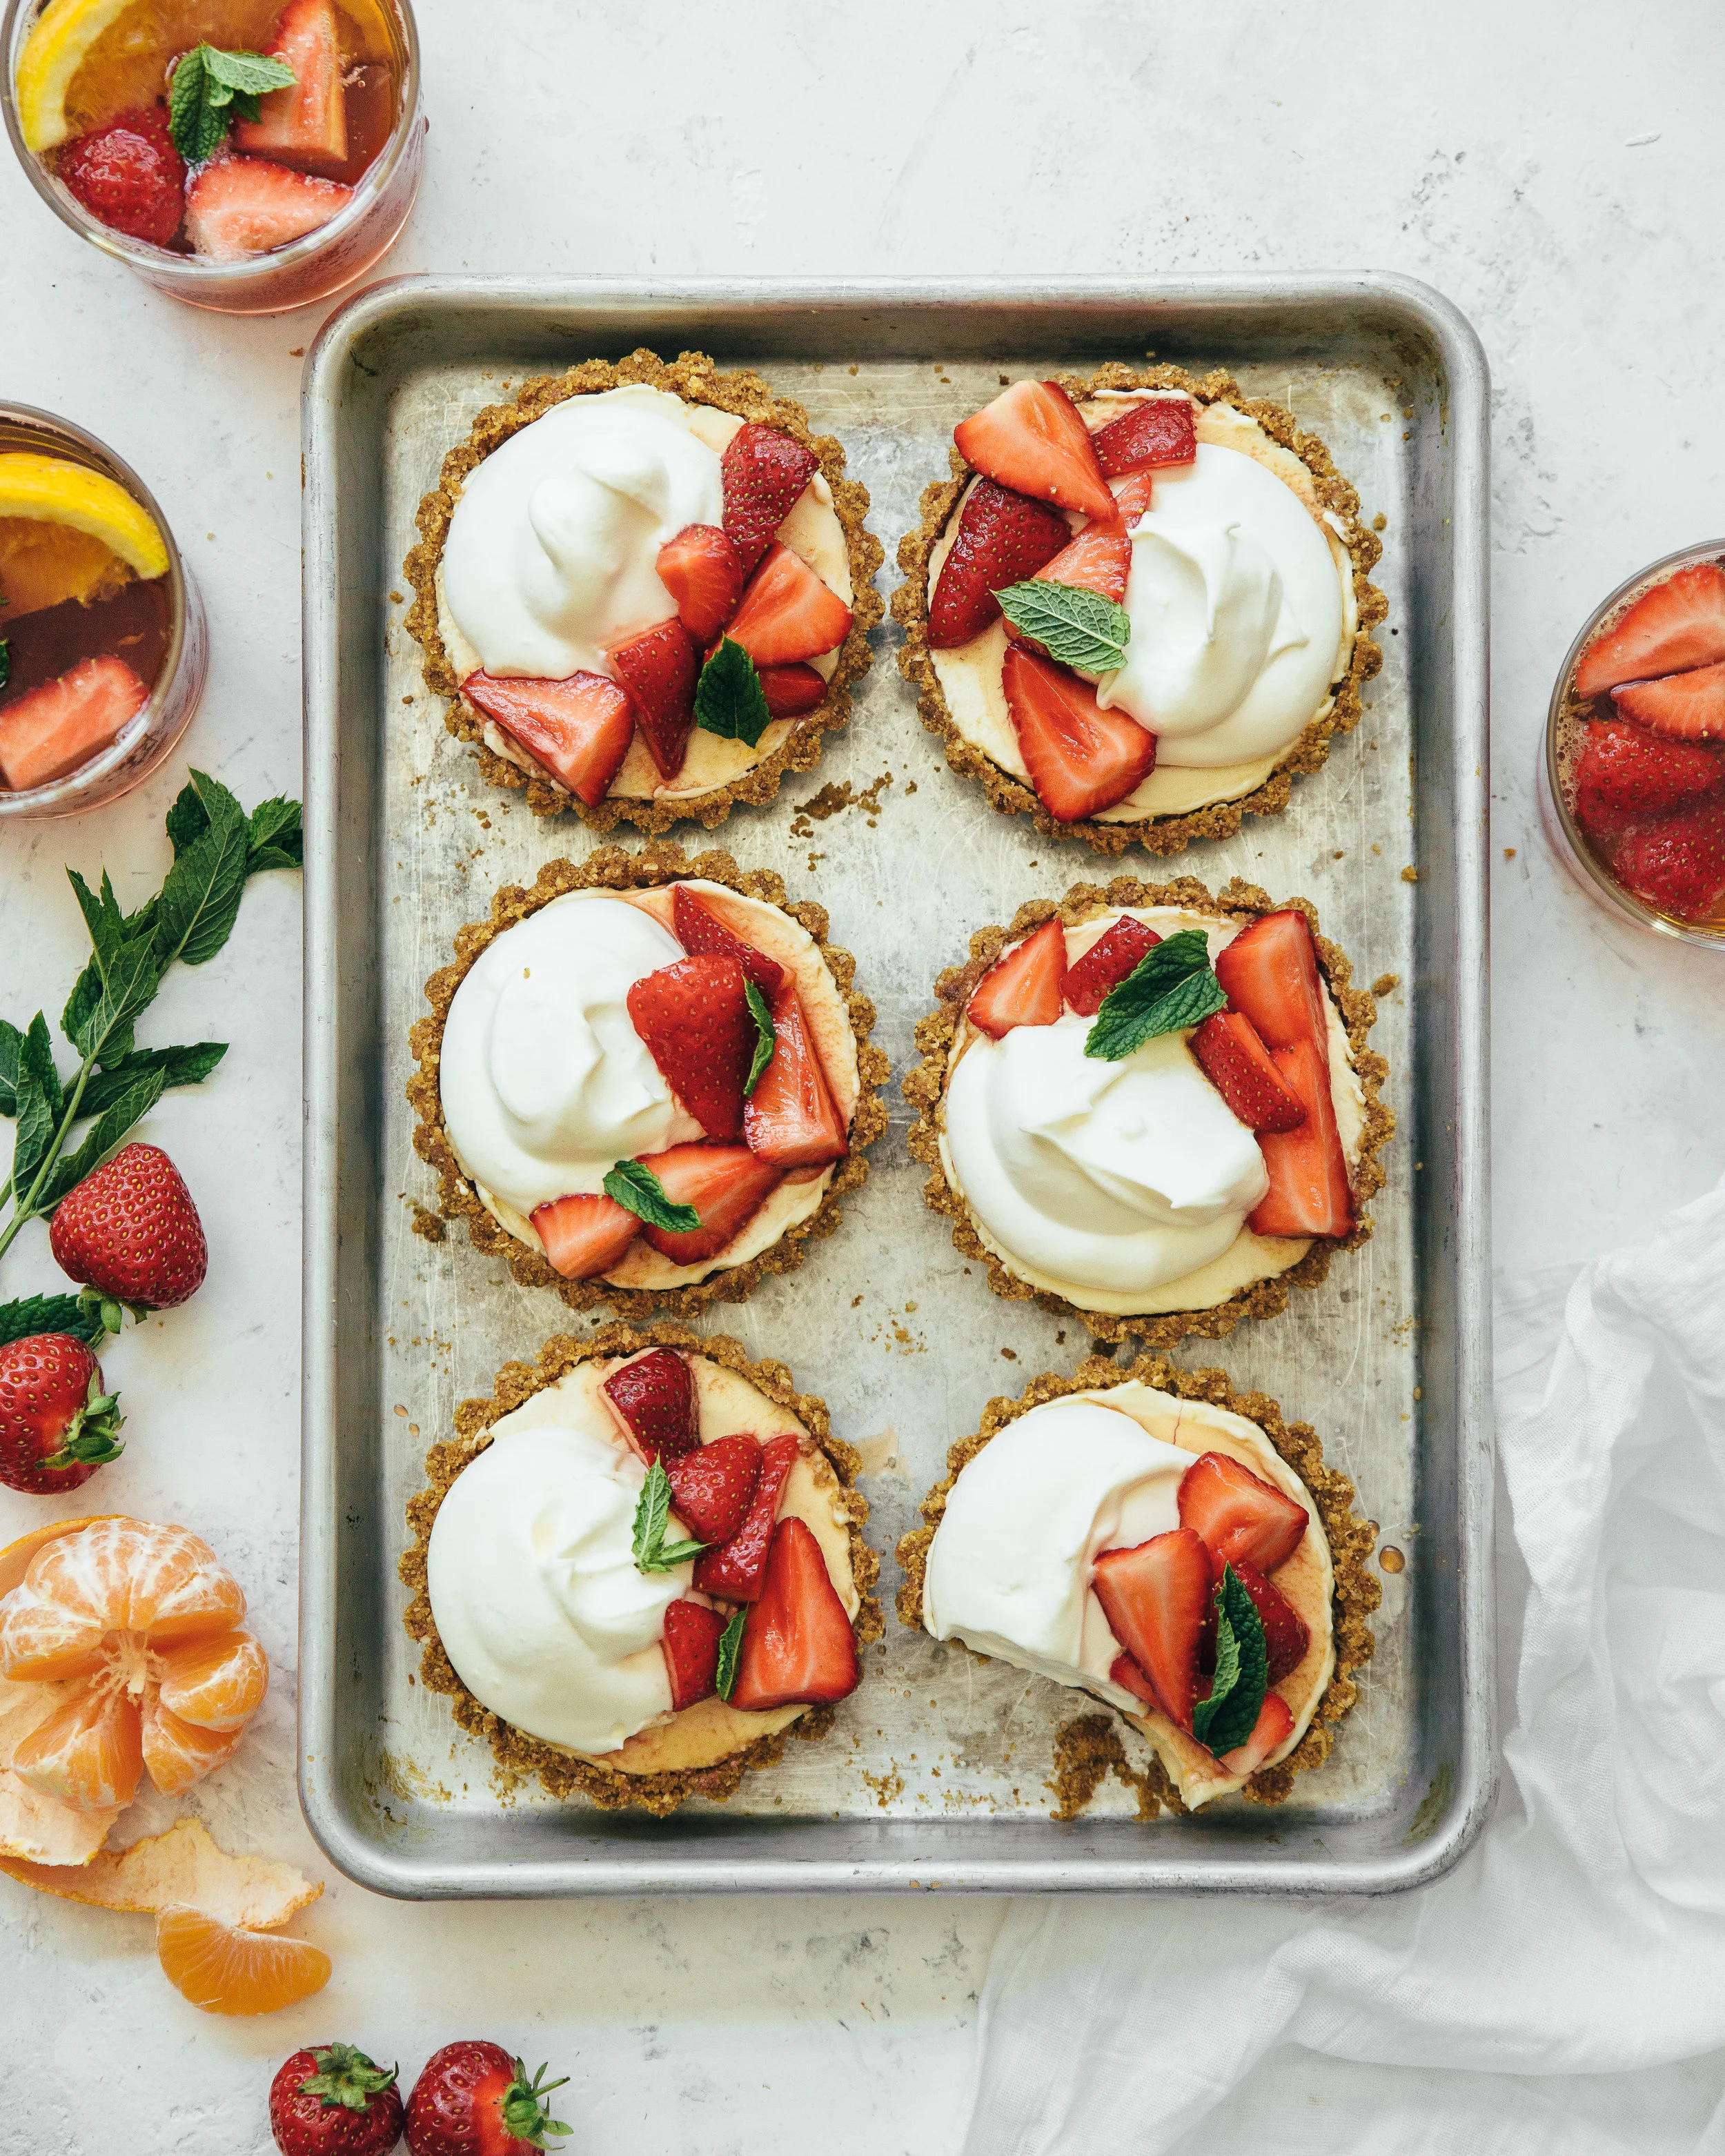
As I am writing this Britain is experiencing that elusive summer heatwave, everyone is walking around confused as to what that ball of heat in the sky is and why it’s so nice outside!  I’ve currently escaped my sauna of a kitchen and am currently daydreaming of days at the beach and BBQ’s but as we get closer to July my mind starts to turn towards the English institution of Wimbledon, two weeks where I’ll eat a whole host of strawberries and cream, pretend I follow the tennis year round, and enjoy the whole experience with a glass or two of Pimm’s. I am doubly excited this year as whilst I always watch the tennis at home, this year for the first time, I will actually be there, in SW19, for the main event and I absolutely cannot wait! In the run up to the championship I am partnering with Pimm’s to give you guys some fabulous dessert ideas to enjoy during the summer season. Today’s recipe is one of those recipes you don't have to stress about making in the heat, there’s no baking so the kitchen, and most importantly you won’t end up hot and sweaty. The first recipe for this partnership is Pimm’s No-Bake Cheesecake Tarts with a Pimm’s Strawberry Topping, it’s the perfect thing for a Wimbledon watch party or for a BBQ this summer.  

No-Bake Pimm's Strawberry Cheesecake Tarts

Cheesecake Tart Bases
200g oat biscuits
75g unsalted butter, melted
2 tbsp light brown sugar
1/2 tsp flaked sea salt

Cheesecake
280g full fat cream cheese
100g icing sugar
large pinch sea salt
75ml Pimm’s
1tsp vanilla bean paste
juice and zest of 1/2 lemon
200ml double cream

Strawberry Topping
Pimm's 100ml
75g caster sugar
juice of 1/2 lemon
10 mint leaves
300g strawberries, cut into quarters
250ml double cream

Pimms (1 of 7).jpg

To make the cheesecake tart bases place the oat biscuits into a food processor and pulse until fine. Pour in the butter, sugar and salt and pulse to distribute evenly. Alternatively place the biscuits into a ziplock bag and use a rolling pin to bash into a powder, then pour into a bowl and stir through the sugar, salt and butter. 

Divide the biscuit mixture between 8 loose bottom 10cm tart tins and press firmly into the bases and up the sides of the tins. I find a rolling pin works wonderfully for this, just make sure you press the mixture firmly so that it is compacted otherwise when you remove from the tins they'll fall apart. Place the tart tins into the fridge.

For the cheesecake mixture place the cream cheese, icing sugar, salt, Pimm’s, vanilla, lemon zest and juice into a large bowl and whisk together until smooth and combined. In a separate bowl whisk the cream until it holds soft peaks and then carefully fold it into the cheesecake base. Divide the mixture between the prepared tart shells and refrigerate for about 4 hours or until the cheesecake mixture is firm. Meanwhile make the strawberry topping, place the Pimm’s, caster sugar and lemon juice into a small saucepan and heat over medium heat and cook until the sugar has dissolved then continue cooking for about 5 minutes or until the mixture has reduced and is syrupy. Remove from the heat, add the mint leaves and stir together for a couple minutes before removing and discarding (the heat of the syrup will draw out the flavour and if left in there much longer the mint will come to dominate the flavour). Whilst the syrup is still hot add the strawberries and set aside to cool.

When ready to serve lightly whip the cream and spoon atop the tarts, along with the strawberries and a little of the syrup. You will be left some syrup which you can use to make Pimm’s cocktails, or you could pour over ice cream and fold through an eton mess. 

In Dessert, Pastry
3 Comments
Chocolate Mousse (1 of 1).jpg

Chocolate Mousse with Orange Baked Rhubarb

Edd Kimber February 17, 2018

It might be a dessert straight from the 80's but I still love chocolate mousse. Take me to a french bistro, give me that large bowl of chocolate mousse and let me dig in. I don't need many adornments but a little lightly baked rhubarb, to go with the dark chocolate, works wonders. This is another recipe that is part of my healthy eating series where I have paired with WeightWatchers for their new Flex Programme, and I know what your thinking, how is chocolate mousse healthy. When it comes to this recipe I have reduced the sugar and fat to make this a bare bones mousse, just chocolate, a little tough of sugar and eggs, no butter and no cream, but absolutely delicious.

75 g dark chocolate
2 tablespoons caster sugar
3 large eggs, seperated
2 tablespoons, level freshly squeezed orange juice
1 portion(s), medium rhubarb
1 tablespoon honey
1 inch slice root ginger

Preheat the oven to 190°C, 170°C fan.

To make the chocolate mousse place a small bowl over a pan of gently simmering water, making sure the bottom of the bowl doesn't touch the water. Add the chocolate and heat, stirring occasionally, until fully melted. Remove the bowl and set aside for the moment.

Place the egg whites into a large bowl and whisk with a hand mixer until foamy. Add the caster sugar 1 tablespoon at a time, whisking for a minute before adding the second. Continue whisking on high speed until the meringue holds medium peaks.

Working quickly, add the yolks to a large bowl and mix in the orange juice. Pour in the melted chocolate, mixing until fully combined. Add a large spoonful of the egg whites and mix in. Fold in the rest of the meringue one third at a time. Once fully combined, divide the mousse between 4 glasses and refrigerate for 4 hours before serving.

Place the rhubarb into a small roasting tin with the honey, orange juice and the ginger, tossing together to coat. Roast in the oven for 10-15 minutes or until softened but still holding its shape. Top the mousse with the rhubarb and any syrup that is in the pan. Top with a few toasted flaked almonds.

Post sponsored by WeightWatchers

In Chocolate, Dessert
1 Comment

Rhubarb Crumble

Edd Kimber February 7, 2018

In celebration of the fact that Bake From Scratch is finally available in stores here in the UK todays recipe is one of mine that appears in the current 'British Issue' that I guest edited. The recipe in the magazine is for a more classic rhubarb and ginger crumble but todays version is infused with two of my favourite flavours fennel and cardamom both of which go beautifully with rhubarb. I grew up in Bradford which is on the border of the Rhubarb Triangle, the area in Yorkshire famous for its forced rhubarb, it really is still where the beat rhubarb comes from. 

This is just a quick post today as I am manically trying to get all of my work out of the way before I head off to the US next week to start the Bake From Scratch tour where we will be visiting San Francisco, Minneapolis and NYC. I am so excited for the tour and cant wait to see you guys out there, so any last minute tips of what I should check out whilst there let me know in the comments. 

Rhubarb Crumble

Cardamom Crumble
150g plain flour
100g caster sugar
80g jumbo rolled oats
130g unsalted butter, diced and chilled
1 tsp ground cardamom

Rhubarb Mixture
600g cups rhubarb, cut into 1 inch pieces
85g-125g caster sugar (depending on how sharp you like your rhubarb)
2 tbsp cornflour
1 tsp ground fennel seeds
2 tsp vanilla bean paste

Custard
600ml whole milk
6 large egg yolks
1 tsp vanilla bean paste
1 heaped tbsp cornflour
50g caster sugar

Preheat the oven to 190C (170C Fan).

To make the crumble mixture place the flour, sugar and cardamom into a bowl and mix together to combine. Add the butter and toss to coat in flour. Use your hands or a pastry blender to cut the butter into the flour mixture until it resembles coarse breadcrumbs. Stir through the oats and set aside for the moment. At this point you can put the crumble into a ziplock bag and freeze for a couple months. It can be used straight from the freezer making it incredibly quick and simple to get dessert on the table. 

For the rhubarb mixture toss the ingredients together in a large bowl and tip into a 9x9 roasting tin or cake tin. The exact size doesn't matter, depending on what you have available you can have a crumble with thicker or thinner layers (I often divide this into two large pie plates and freeze one of the crumbles assembled, ready to bake). 

Bake in the preheated oven for about 45-60 minutes or until the crumble is golden and the filling is bubbling. Remove from the oven and allow to cool for 5-10 minutes before serving. 

Whilst the crumble is baking quickly make the custard. Whisk everything except the milk together in a large bowl, until smooth and fully combined. Add the milk to a medium sized saucepan and bring to a simmer. Once at temperature pour the milk over the egg yolk mixture whisking constantly to prevent it from curdling. Pour the custard back into the pan and whisking contantly cook until the mixture comes to a boil and has thickened enough that it can coat the back of a spoon. Remove from the heat and pour into a jug. Serve whislt still warm.

In Dessert
3 Comments
IMG_0603.JPG

Cranberry Meringue Roulade with Orange Mascarpone

Edd Kimber November 23, 2017

During the Christmas festivities we put a lot of pressure on ourselves to make elaborate meals with fancy desserts that take time and effort to make. Nothing wrong with that but per se but sometimes that effort and time means less time spent with family and friends, to enjoy the holiday. This dessert is perfect for those of us that want something delicious but also something that is quick and simple to prepare. If you've never made a meringue roulade before don't fret, they are fairly forgiving and as they are prone to the occasional crack, embrace them and forget about perfection, rustic is the name of the game with this recipe.


Cranberry Compote

200g cranberries, fresh or frozen

75g caster sugar

juice of 1 lemon


Roulade

4 large eggs

225g caster sugar

a few drops of lemon juice

1 tsp almond extract

1 tsp cornflour

4 tbsp flaked almonds


Orange Mascarpone Cream

250ml double cream

225g mascarpone

zest of 1 large orange


Preheat the oven to 180C (160C fan).


To make the compote place the cranberries into medium sized saucepan along with the sugar and lemon juice. Cook over a medium/high heat until the cranberries have released a lot of juice and it has reduced to a syrupy consistency, roughly 5-10 minutes. Remove from the heat, pour into a small container, cover, and refrigerate until needed. This compote is sharp from the cranberries and lemon juice but don't be tempted to add more sugar, the sweetness of the meringue and the creaminess of the mascarpone balance this out beautifully.


To make the roulade, lightly grease a 37x26cm rimmed baking tray (the exact size is not crucial but if you you go much smaller the meringue will be very thick and hard to roll and much bigger the meringue will be thin and will crack more than expected) and line with a piece of parchment paper allowing a little excess to go up the sides of the tray, the meringue will rise a little as it bakes and you don’t want to end up with the roulade glued to the rim of the tray. To make the roulade, place the egg whites into a large bowl and mix with an electric whisk on high speed until the egg white is foamy. Slowly add the sugar, a tablespoon at a time, whisking until the meringue holds stiff peaks. Add the almond extract and cornflour and whisk briefly to combine. Spread the meringue evenly over the prepared baking tray and sprinkle with the flaked almonds. Bake in the preheated oven for about 30 minutes or until the meringue is lightly browned and feels firm to the touch, don't worry the meringue will be soft and pillowy underneath meaning it will be easy to roll.


Remove the roulade from the oven and immediately turn it out onto another sheet of parchment paper, peeling off what was the original lining. Allow the meringue to cool.


For the mascarpone filling, add the mascarpone and orange zest to a large bowl and beat together until the mascarpone is soft. In a separate bowl whisk the cream until it barely holds it shape. Fold the cream into the mascarpone in two or three additions, as you add the cream and mix it together the mixture should become a little stiffer, you want a soft cloud like mixture, that perfect light whipped cream consistency.


To assemble the roulade spread the cream evenly over the meringue and top with dollops of the compote, lightly swirling to combine. Gently roll the roulade into a tight spiral, using the parchment to help tease the meringue into shape. Don’t worry that the outside will crack a little, its part of the charm of a meringue roulade and perfection is overrated anyway.


To finish dust with a little icing sugar or top with a few extra cranberries. Serve on the day made, refrigerating until needed if not serving straight away.

In Dessert
1 Comment
  • Recipes
  • Older
  • Newer

Twitter

  • Was 8 original films, 3 spin off films, a two part play not enough. Can we have something new. https://t.co/cBZdGEGeyv
    Apr 4, 2023, 1:46 PM
  • RT @deliciousmag: Cacio e pepe, but make it buns! These seriously cheesy bread rolls from @TheBoyWhoBakes are inspired by his favouri… https://t.co/oDZlaDgnN2
    Apr 2, 2023, 11:08 AM
  • RT @TheDailyShow: Congrats to Donald Trump on finally winning a majority of votes! https://t.co/ezP55HZgl0
    Mar 31, 2023, 12:43 AM

Instagram

This weeks bonus recipe, for subscribers to my newsletter, is this gorgeous sour cherry and coconut gateau basque. The crust is a buttery cross between pastry and cake, think a cakey cookie. The filling is a layer of sour cherry topped with a rich coconut custard. A real fun one to make too! Link to my newsletter can be found in my bio - #gateaubasque #pastrycream #coconut #sourcherry
In this months @olivemagazine (out today) the team came and photographed my petit kitchen and we talked about how we put our stamp on the place, without spending a fortune. We hated the bland kitchen that we inherited but, as it was relatively new an
In this months @olivemagazine (out today) the team came and photographed my petit kitchen and we talked about how we put our stamp on the place, without spending a fortune. We hated the bland kitchen that we inherited but, as it was relatively new and in good condition, it felt a waste to rip it out and we also didn’t want to spend the money it would take to rip out the whole thing and replace it (it’s a howdens shell so we could have done something cheaper like @plykeakitchens @holte.studio @madebyhusk) so instead I painted all of the cabinets, using @makeitrustoleum kitchen cabinet paint, to give it some personality and lighten the whole thing. Check out the magazine for the full run down. - #kitchendesign #kitchenremodel #rustoleumcabinettransformations #rustoleumkitchencupboardpaint #kitcheninspiration #theboywhobakes #olivemagazine
Are you making scones all wrong? Maybe, maybe not? But I do want to show you how I make them! This recipe is based on the method I learnt at @belmondlemanoir 12 years ago when I did a stage, and it makes the absolute lightest scones. And shock horror, it involves kneading the dough, albeit very lightly. You can get the full recipe in this weeks newsletter (free) linked in my bio. - #scones #bakingday #worldbakingday #afternoontea #hightea #englishscones #clottedcream #creamtea #theboywhobakes
facebook
  • Contact

The Boy Who Bakes

Edd Kimber

facebook