The Boy Who Bakes

Edd Kimber
  • Home
  • Recipes
  • My Books
  • Blog
  • Recipe Index
  • About
  • Home
  • Recipes
  • My Books
  • Blog
  • Recipe Index
  • About

Recipes

  • All
  • baking
  • Biscuits and Cookies
  • Breads and Quickbreads
  • Bundts
  • Cakes
  • Chocolate
  • Dessert
  • drinks
  • Holidays
  • Pastry
  • Scones and Quickbreads
Nordicware 75th-3.jpg

Neapolitan Marble Bundt Cake

Edd Kimber April 30, 2021

This post is sponsored by Nordicware UK

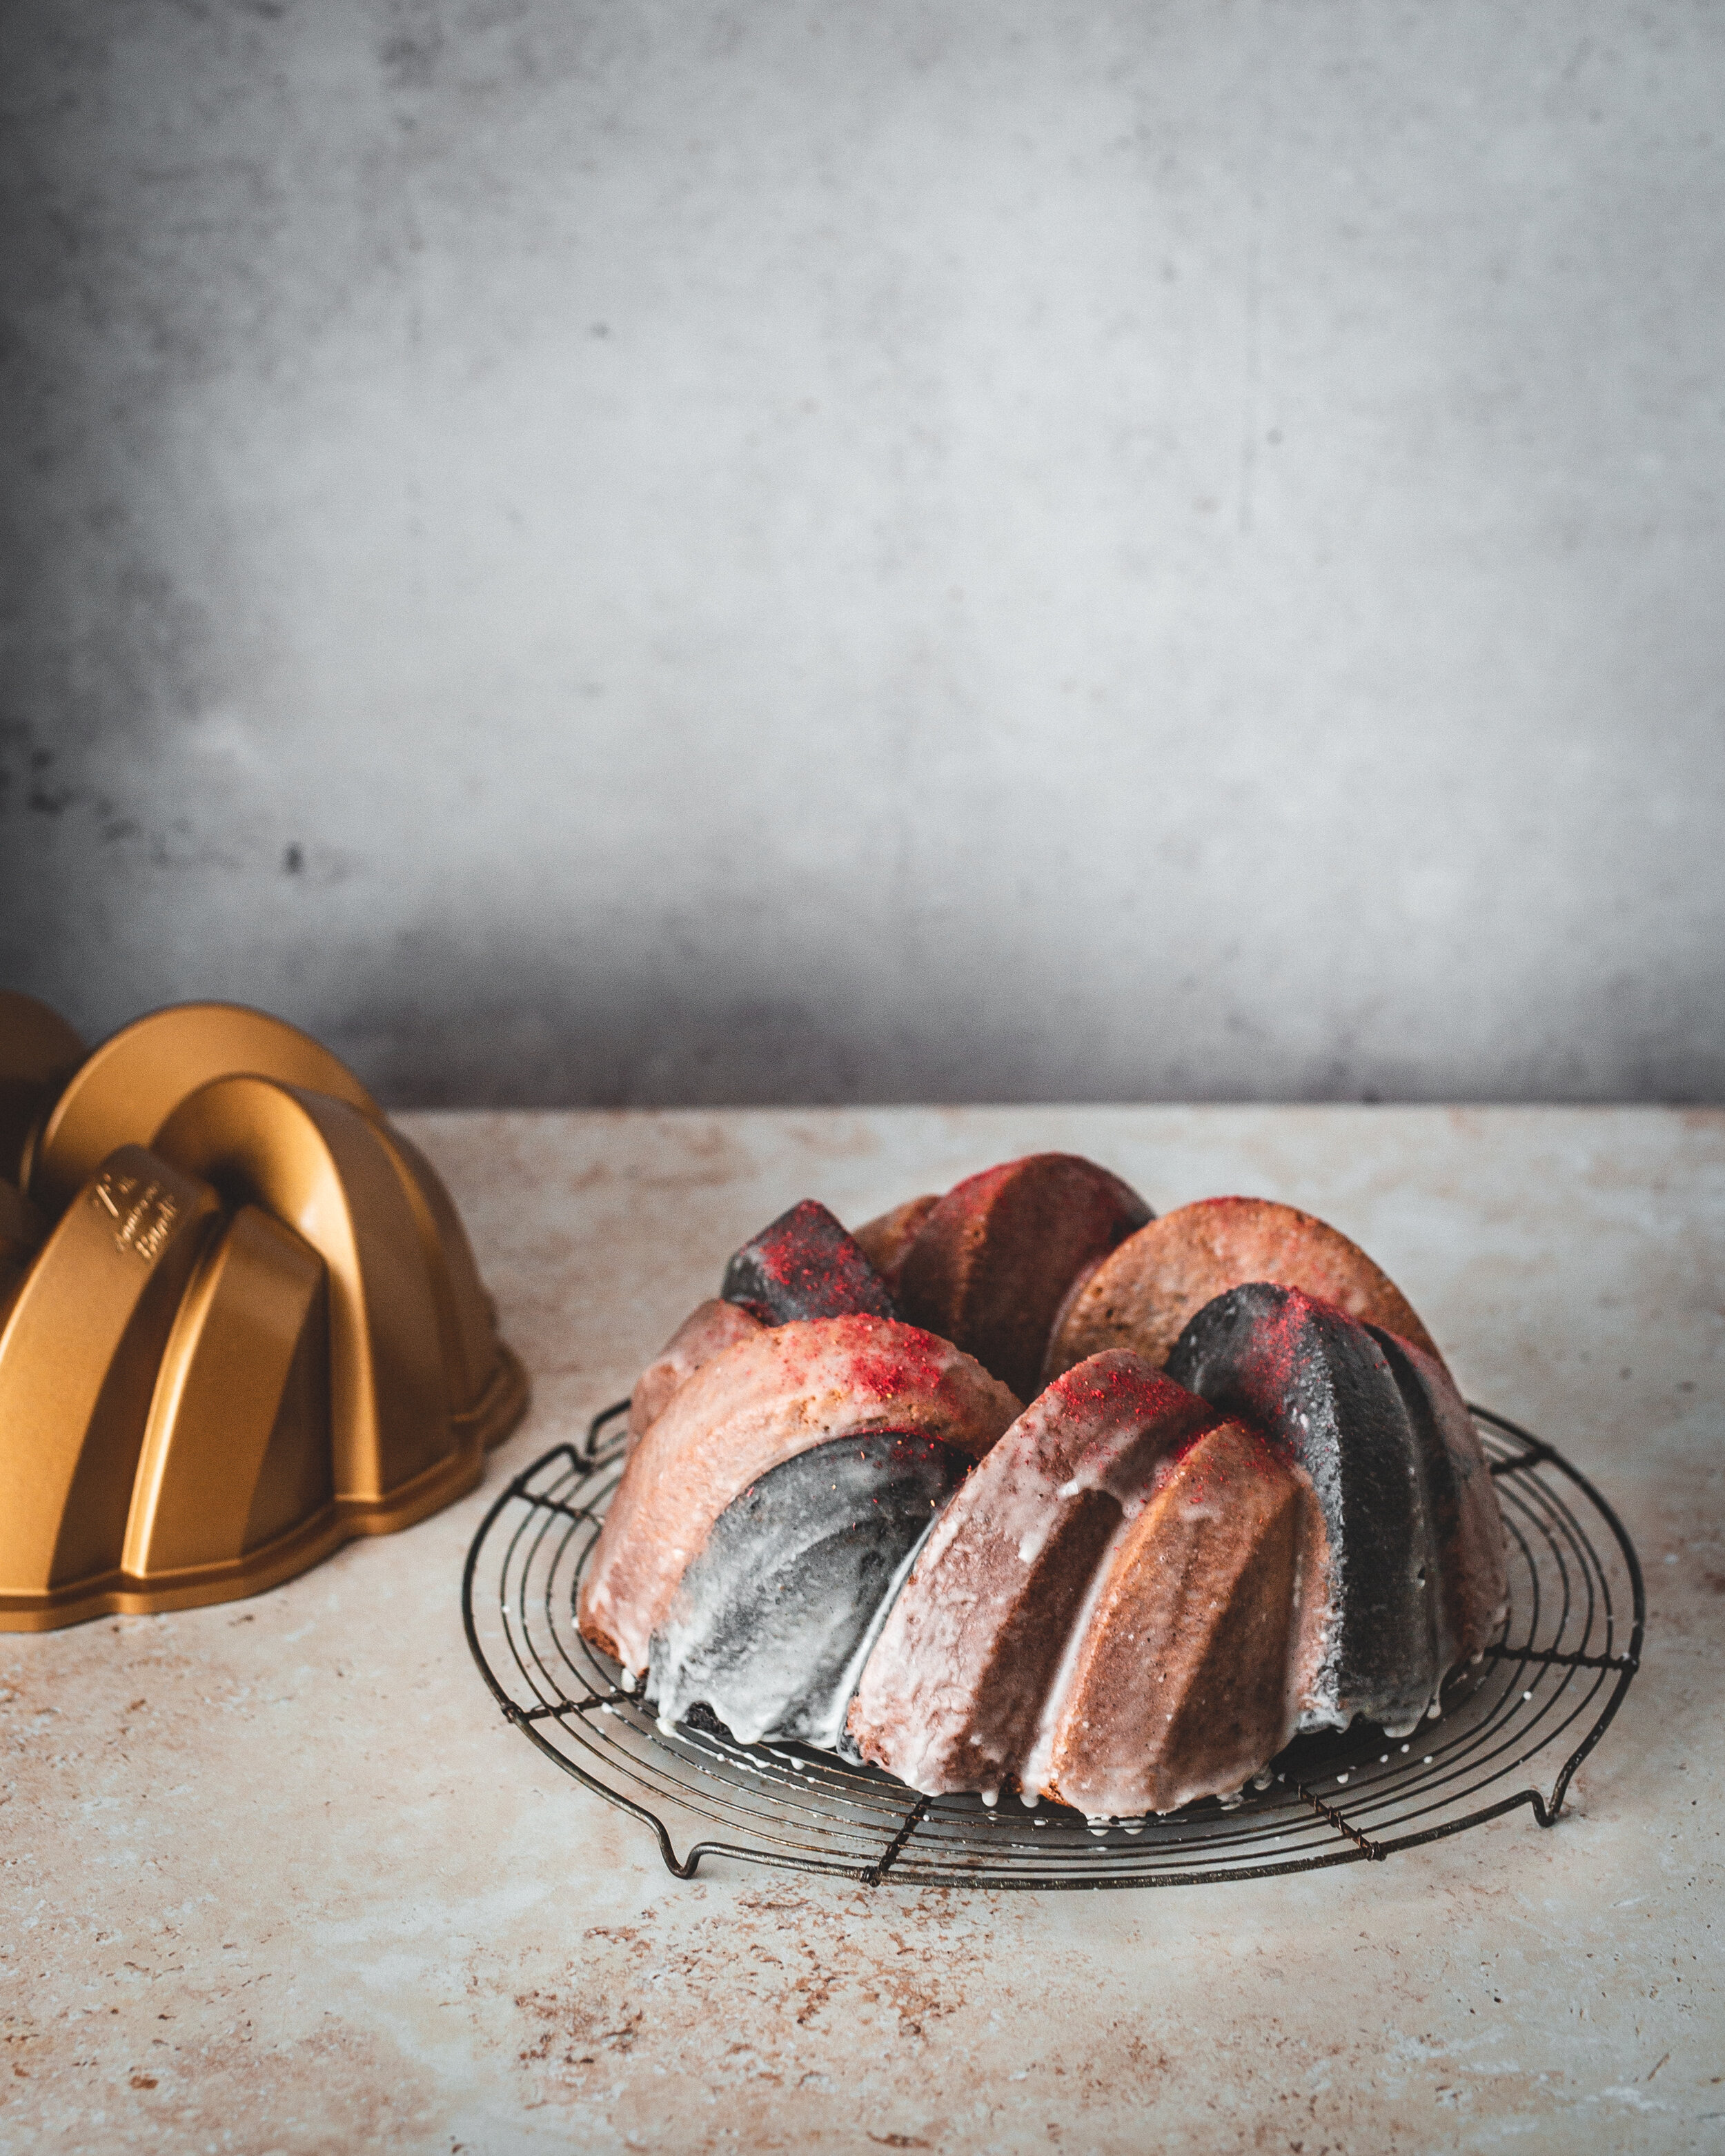
It is no secret that I am a big fan of Bundt® cakes (I’ve written enough recipes for them for that to be pretty obvious) so I’m thrilled to be posting a very special anniversary recipe today in collaboration with Nordicware, the creators of the Bundt® pan. This year, the Minneapolis based bakeware manufacturer turns 75 years old, and to celebrate they have released a new 75th Anniversary Braided Bundt® Pan and they tasked me with coming up with something special to bake in it.

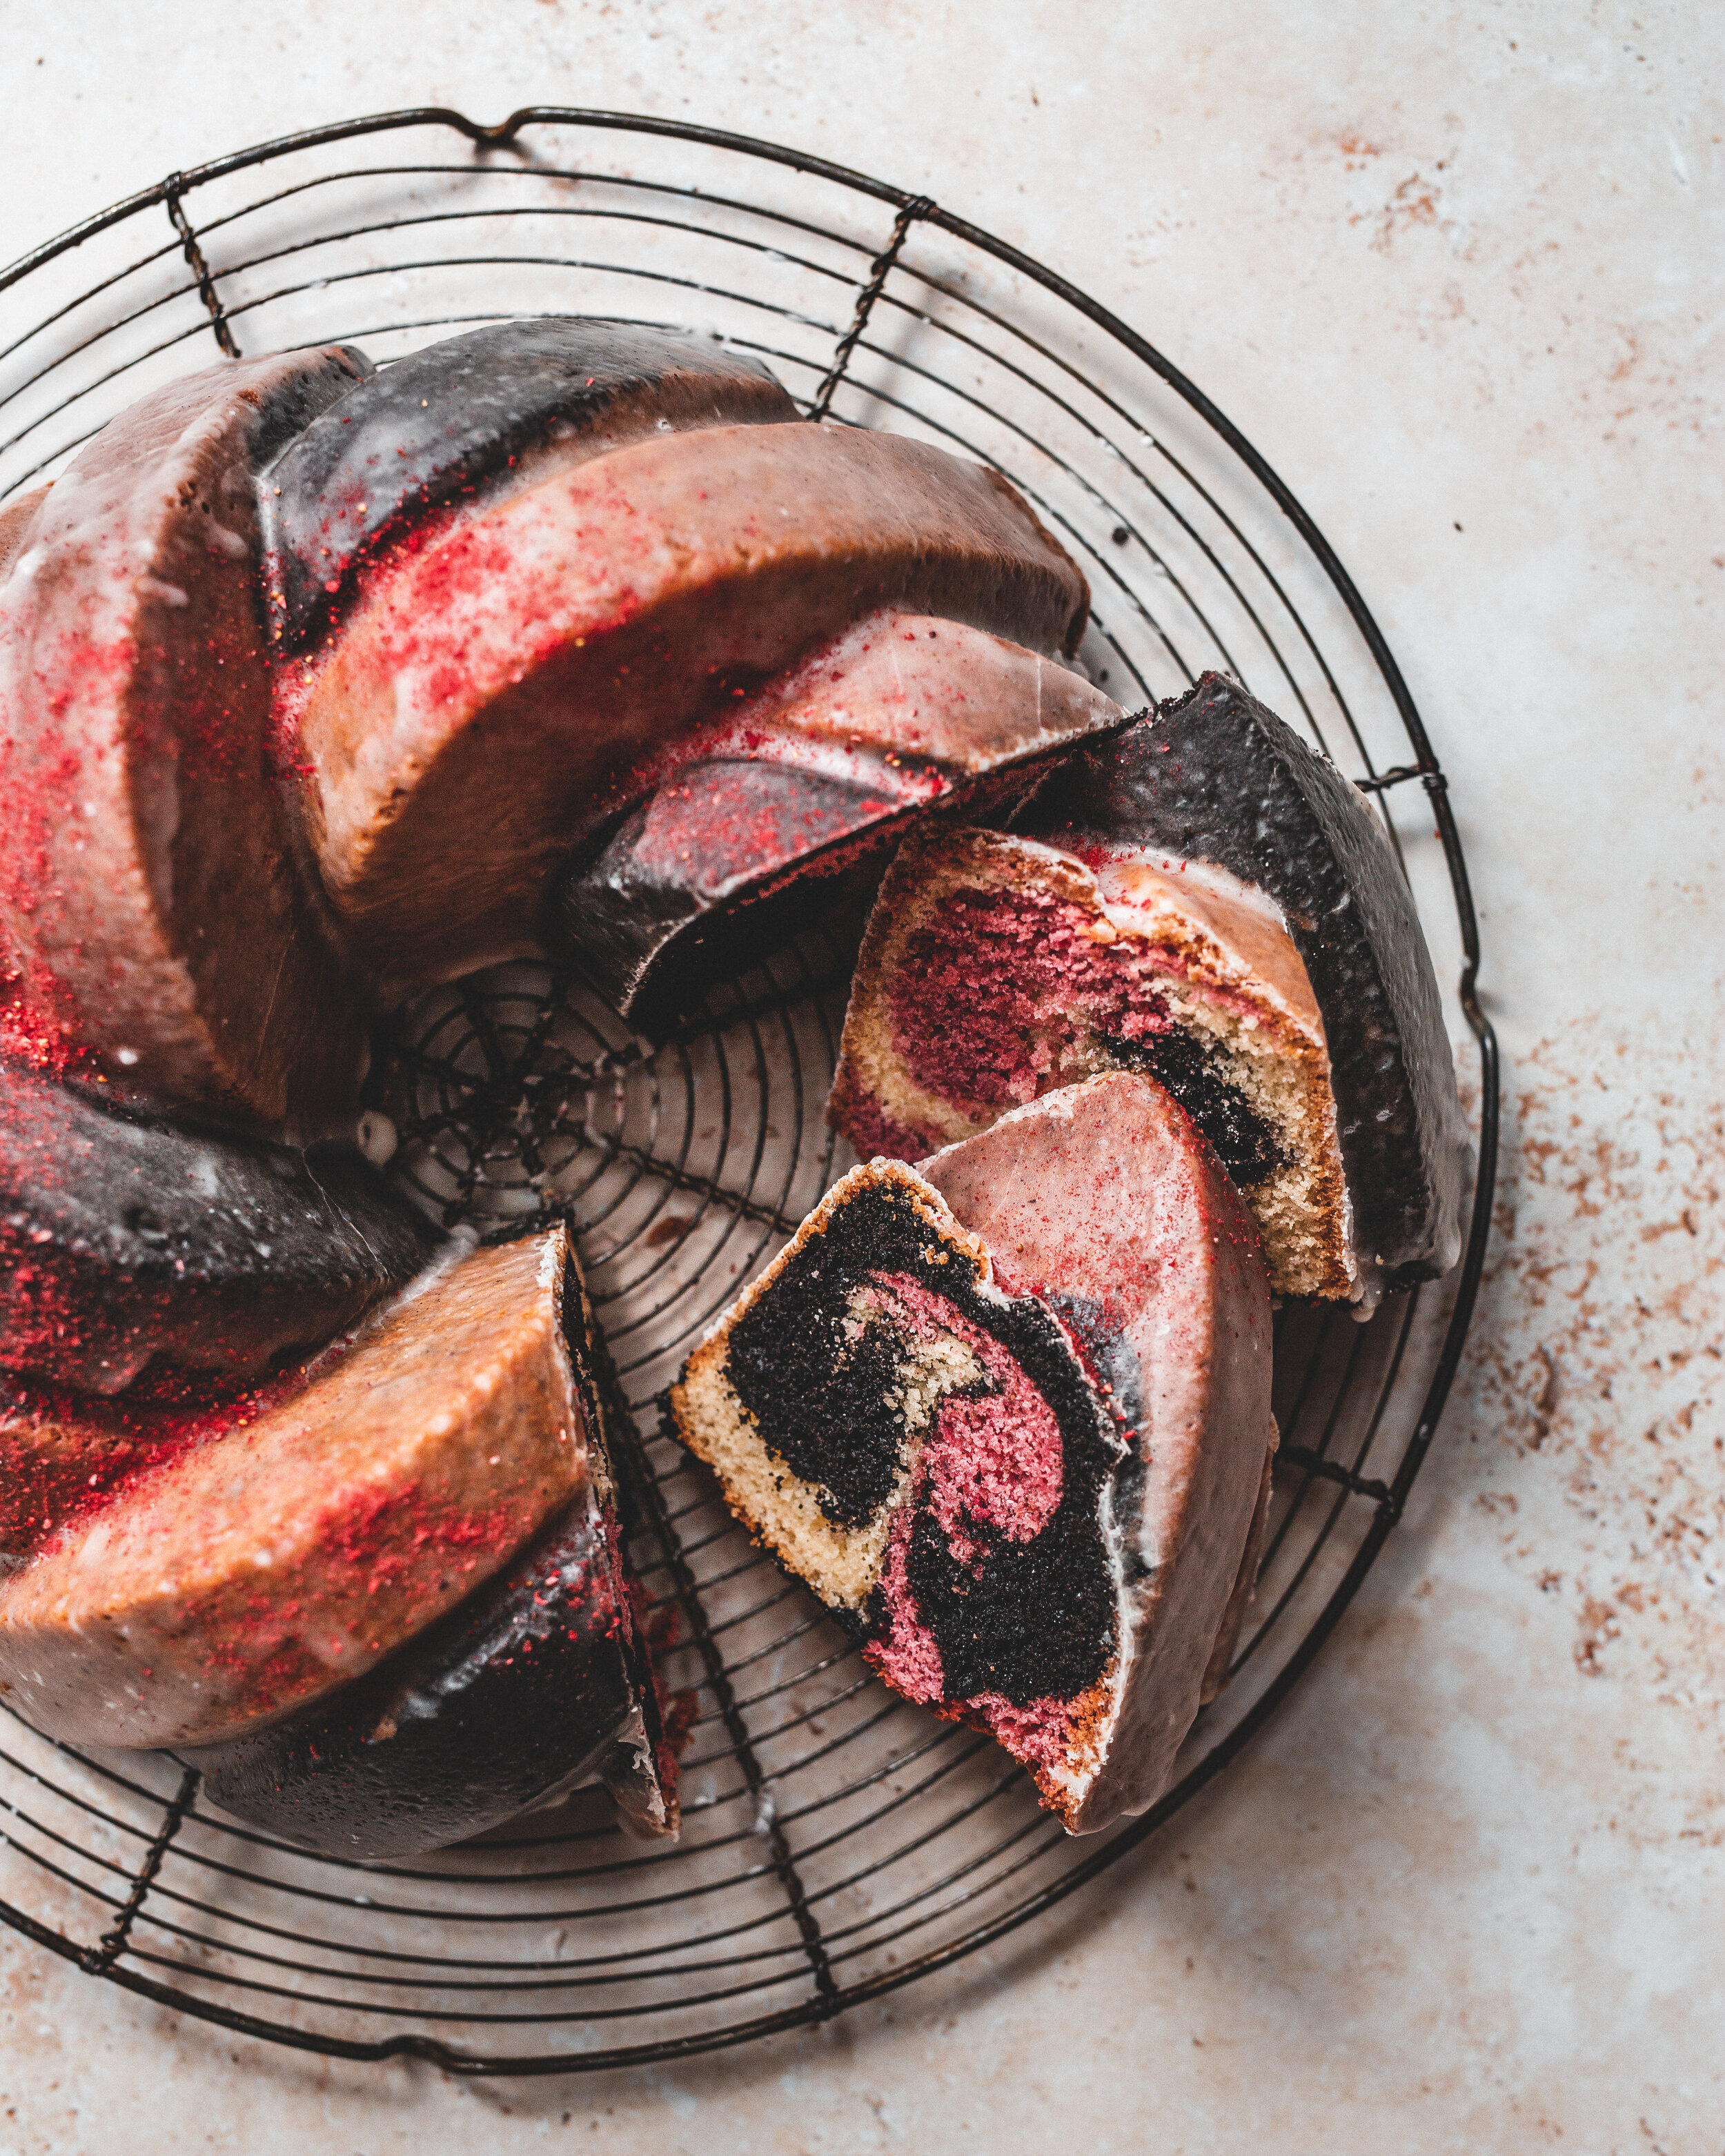
The recipe is inspired by that classic ice cream, the Neapolitan, a mix of chocolate, vanilla and raspberry. The cake is based around the classic pound cake, it’s dense but moist and needs no fancy adornment, although I’ll never object to a ganache or buttercream, the cake itself is good enough on its own. For the chocolate mixture I use a deep dark black cocoa which gives a great colour and flavour. For the vanilla flavour I also add a little white chocolate which makes a wonderful tender cake. The final section is made with freeze dried raspberry powder for a pop of colour and a great raspberry flavour. 

The anniversary Bundt® pan has very distinct sections so I carefully add a different batter to each section so that when the cake is turned out it has a distinctive design. Inside the cake something special happens. Whilst the outside stays distinct in its separation of colours inside the batters naturally swirl together giving a classic marble cake look without any actual swirling. To give the cake a little sparkle, a little finishing touch, the cake is brushed with a thin icing sugar glaze, that gives it an almost doughnut like glaze, thin and translucent and which shatters as it is cut through. 

If you are in the UK the 75th Anniversary Bundt® Pan is available here

Nordicware 75th-16.jpg


Neapolitan Marble Bundt Cake
Serves 15

Base Batter
340g unsalted butter, room temperature
450g caster sugar
6 large eggs
2 tsp vanilla extract

Chocolate Batter
85g plain flour
50g cocoa powder
1 tsp baking powder
1/2 tsp fine sea salt
40ml sour cream

White Chocolate and Raspberry Batter
250g plain flour
2 tsp baking powder
1 tsp fine sea salt
80ml sour cream
75g white chocolate, finely chopped
3 tbsp freeze dried raspberry powder
A little red gel food colouring

Prepare your bundt pan, brushing with a thin layer of cake goop, or brushing with softened butter and dusting with a thin layer of flour (read my guide on ensuring your bundt cake doesn’t stick here)

Place the white chocolate into a heatproof bowl and set over a pan of simmering water and heat, stirring occasionally, until fully melted. Remove from the heat and set aside whilst you prepare the cake. 

Place the butter and sugar into a large bowl and using an electric mixer beat on medium speed for about 5 minutes or until light and fluffy. Add in the eggs one at a time, beating until fully combined before adding another. Finish by briefly mixing in the vanilla. 

Scrape one third of the batter into a separate bowl (top tip: weigh the bowl you want to make the batter in before you start. This way you can simply weigh the bowl with the batter, deduct the bowl weight and then can easily find the weight of the batter). To this third add the ingredients for the chocolate batter, mixing until a smooth cake batter is formed. Into the remaining two thirds add everything for the white chocolate and raspberry batters, except the melted chocolate, raspberry powder and food colouring, mixing to form a smooth cake batter. Take this batter and divide again into two equal portions. To one mix through the melted chocolate and to the other mix in the raspberry powder and a little food colouring to make a vibrant pink. 

To portion the batter into the tin you have two choices, you can spoon the batters into the tin trying to keep each batter neatly inside each section of the tin, alternating the colours as you go, or if you want the neatest possible finish, you can use piping bags. Whichever method you choose add the batter in slowly, little by little, gradually increasing the height, which will help ensure a clean design on the outside of the cake. You can of course simply dollop in the batter in a random fashion if you want to keep things simple.

Nordicware 75th-12.jpg

Before you bake the cake give the pan a couple sharp taps on the worksurface so that the batter fills every nook and cranny of the pan. Pop the cake into the oven for about 55 minutes or until a skewer inserted into the cake comes out clean. Remove the pan from the oven and set onto a wire rack to cool for 10 minutes before inverting the cake and allowing it to cool fully. If you are opting to make the vanilla glaze make this before turning the cake out and use as soon as the cake has been removed from the pan whilst still hot. 

Serve once fully cooled. The finished cake will keep for 2-3 days if kept well covered. 

Nordicware 75th-11.jpg

Vanilla Glaze 
150g icing sugar
2 + 1/2 tbsp milk
1 tsp vanilla bean paste
Small pinch of salt.

Add the icing sugar, 2 tbsp of milk, the vanilla and salt to a small bowl and mix together to make a smooth glaze. The finished texture wants to be on the thin side and fairly runny, you may need to add another 1/2 tbsp of milk to get to this texture. 

Whilst the cake is still hot from the oven use a pastry brush to coat the cake in the glaze. I add the glaze now as the heat from the cake makes the glaze set and turn slightly translucent almost like the glaze on a classic ring doughnut. 

In Bundts, Cakes Tags bundt, neapolitan, marble, pound cake, nordicware
2 Comments
challah-3.jpg

Salted Sesame Challah

Edd Kimber April 7, 2021

I rarely get a chance to bake for the fun of it anymore, every recipe is for a job, a book, or some other project. I miss it. I miss the joy of waking up and deciding today is a chocolate chip cookie day. It’s not that I don’t love my job and its not as if there isn’t enough baked goods in my life, its just the spontaneity. These last weeks have been a blur of deadlines as I try and get all the projects I have on the go past the line, so that I have the time to spend with my puppy when he gets here at the end of the week (I can barely contain my excitement) but thankfully I got everything finished a little early and instead of taking it quietly for a few days, I woke up with the desire to bake something, specifically I wanted to make a loaf of Challah. 

Challah is a bread of Jewish origin, commonly served on Friday nights in Jewish households to celebrate the sabbath. In keeping with Jewish traditions and religious beliefs the bread is made without dairy, so no milk or butter as found in the similar French bread, Brioche. The reasons for wanting to make a loaf were two fold. Firstly I had been seeing so many loaves over on tiktok (yes I am on tiktok now, follow me if you’re on the app) and it got me itching to make one. Secondly I had been wanting to play around with a braided crown loaf for a long time but never found the excuse. Whilst any loaf of bread can be braided in this manner a crown braided Challah is often served on Rosh Hashanah, the round shape representing either community, the passing of the seasons or a spiral of upwards progress. 

The recipe I loosely based my loaf on comes from Tel Aviv based baker Uri Scheft and his book Breaking Breads. My adaption takes into account the flours of the UK, making a dough for a single loaf and flavouring it with honey, sesame and salt. 

Salted Sesame Challah
250g plain flour
250g strong white bread flour
7g fast action dried yeast
10g fine sea salt
185ml lukewarm water
1 large egg
1 large egg yolk
4 tbsp honey
3 tbsp vegetable oil
Flaked sea salt and sesame seeds, for sprinkling

For the dough place the two flours, the salt and the yeast into a large bowl and mix together. In a jug whisk together the remaining ingredients, whisking until the honey dissolves into the water. Make a well in the dry goods and pour in the wet goods. Mix together to form a shaggy dough and then tip out onto the work surface and knead until smooth and elastic, about 10 minutes. The finished dough should be smooth and supple and a little firm. Challah dough isn’t sticky like brioche, it should be easy to handle. 

challah-4.jpg

Form the dough into a ball and place into a lightly oiled bowl. Cover and set aside until doubled in size, about an hour. Once risen tip the dough out onto the work surface and knock back before dividing into four equal sized pieces. Working with one piece of dough at a time press into a flat rectangle and roll up like a small Swiss roll (watch the video to get a better visual of this process). Roll each piece of dough into a strand that is roughly 40-45cm long.

Braiding the four strands into a loaf of challah is not as difficult as it looks but to make it easier I encourage you to watch the video on this page, watch it a few times, get familiar with the process as it is very easy to get lost in the process once you start. When I braid the loaf I basically say to myself ‘under goes over’ repeatedly and that keeps me on the right track. If you want a slower, step by step, guide to this particular braid this video from Jamie Gellar is also very helpful.

challah-2.jpg

Once the loaf is braided and you’ve tucked the ends under the loaf, carefully lift the challah onto a parchment lined baking tray. Lightly cover and set aside or until almost doubled in size, about 45-60 minutes. Whilst the bread is proving preheat the oven to 220C (220C Fan).

When ready to bake brush the bread with a lightly beaten egg white and sprinkle liberally with flaked sea salt and sesame seeds. Place the baking tray into the oven and bake the challah for about 25 minutes or until golden brown. Remove from the oven and set onto a wire rack and leave until fully cooled.

The challah will keep for 2-3 days.

In Breads and Quickbreads Tags challah, jewish, bread, kosher, dairy free, braided, sesame, salted, crown braid, crown braided challah
2 Comments
Simnel Cake Feed.jpg

Easter Simnel Cake

Edd Kimber April 2, 2021

This post is sponsored by Lyle’s Golden Syrup

This Easter cake is a British classic, a traditional fruit cake, lightly spiced and similar to a light Christmas cake or a Dundee cake. The difference is mainly in the decoration and the use of marzipan. Marzipan isn’t just used to coat the outside of the cake it is also baked into the cake itself, a hidden layer in the middle of the cake. Like all fruit cakes of this style it keeps incredibly well and actually gets better after it sits for a while. Also like other fruit cakes they can sometimes be a tad dry. To counter this issue you need to bake the cake correctly, prevent it from drying out in the oven. You can also choose the right ingredients, in this version I have used Lyle’s Golden Syrup as a sweetener as this gives both a great flavour and it has the added benefit of making the cake moist and keeping it that way for longer. 

The decoration of a Simnel cake is also traditional and has a story to it. Sat atop the cake is a layer of marzipan and around the edges a ring of marzipan balls, 11 of them. If you know the Christian Easter story you might guess that these are to represent the 12 apostles minus 1 which represents Judas and his betrayal of Jesus. Whilst the story attached to the cake is fairly widespread the actual origins of the cake are harder to pinpoint, simnel cakes of some fashion are known to have been made since medieval times but the exact origins are likely lost to history. 


Simnel Cake
Serves 12-15

170g sultanas 
170g raisins 
170g currants 
85g mixed peel 
85g glacé cherries 
Zest of 1 orange 
3 tbsp rum, brandy or whisky (or orange juice)
170g unsalted butter, room temperature
100g light brown sugar 
75g Lyle’s Golden Syrup
4 large eggs 
170g plain flour 
85g ground almonds 
1 tsp cinnamon 
1 tsp mixed spice 
1/2 tsp fine sea salt
450g marzipan 
Apricot jam, for decoration

The day before baking the cake prepare the dried fruit mixture. Add the sultanas, raisins, currants, mixed peel and glaze cherries into a large bowl and pour over the alcohol (or orange juice if you prefer). Zest the orange and add to the fruit. Stir everything together, cover and set aside until ready to bake. 

Preheat the oven to 150C (130C Fan). Lightly grease a deep 20cm (8 inch) round cake tin and line the base and sides with a double layer of parchment paper. 

In a large bowl beat together the butter, sugar and Lyle’s Golden Syrup, using an electric mixer fitted with the paddle attachment, on medium speed for about 5 minutes or until light and fluffy. Add the eggs, one at a time, beating until fully combined before adding another. In a separate bowl whisk together the flour, almonds, spices and salt. Add this flour mixture to the bowl with the butter mixture and mix together until a smooth cake batter is formed. Add the soaked fruit mixture and mix briefly until evenly distributed. Set the cake batter aside for the moment. 

Simnel.jpg

Take a third of the marzipan and roll out, on a work surface dusted lightly with icing sugar, into an 18cm circle. Scrape half of the cake batter into the prepared tin and spread into an even layer. Gently place the marzipan on top of cake batter, setting it in the middle of the tin so that there is a thin layer of batter showing all around the marzipan. Scrape the remaining cake batter into the tin and spread into an even layer. 

Bake in the preheated oven for about 2 & 1/2 - 2 & 3/4 hours or until a skewer inserted into the cake comes out clean. Check the cake after about 100-120 minutes and if the cake is browning too quickly carefully tent with foil to prevent it browning further. Once baked remove and set aside for at least 6 hours to cool fully.

To decorate the cake add a couple tbsp of the jam into a small saucepan with a splash of water and bring to a simmer. Brush the top of the cake with the jam. Using another third of the marzipan roll out as before into a 20cm circle and place on top of the cake. For a decorative flourish, crimp the edges the marzipan like you are making a pie. Take the final third of the marzipan and divide into 11 equal sized pieces, rolling into balls. Brush the base of each ball with a little jam and use this to glue the balls around the edge of the cake. 

You can serve the cake as is but sometimes a little blowtorch action is called for. Light the blowtorch and lightly burnish the marzipan. I like to do this to the balls only but you can do this to the whole layer of marzipan if you prefer.

Kept in a sealed container and wrapped well this cake will keep for a couple weeks.

Tags simnel cake, simnel, easter, fruitcake, fruit cake, dried fruit, marzipan, almonds, golden syrup
1 Comment
fried chicken.jpg

Fried Chicken Sandwiches

Edd Kimber March 17, 2021

I haven’t had much time to play around in the kitchen recently, especially when it doesn’t concern work. So after a stressful week and with a quiet weekend ahead of me I was in the mood for a cooking project. And I had a specific project in mind. I was craving fried chicken sandwiches. That seemed like a perfect way to spend a quiet day at home to me.

The chicken element is pretty classic, a spiced buttermilk brine and a spiced flour coating. I add in some cornflour as the starch helps to create a light crisp coating. The buns are the extra special element in this recipe, they’ll be the fluffiest buns you will ever make and that is down to the tangzhong method. This is a method by which a small amount of flour and milk are cooked together to make a thick paste. This gelatinises the starches and enables the dough to hold onto more water. This allows the buns to get better oven spring and will make for the absolute fluffiest buns you’ll ever make.

If you’re not already following me over on TikTok (yes I’m one of those people who is way too old to be on tiktok but I’m really enjoying it) I am posting videos of the buns and the chicken.

Tangzhong Buns.jpg

Fried Chicken
Serves 4

200g plain flour
50g cornflour
4 chicken breasts
750ml buttermilk
60ml hot sauce
2 tbsp paprika
1 tbsp cayenne powder
2 tbsp dried oregano
1 tbsp garlic powder
1/2 tbsp mustard powder
1/2 tbsp fresh ground black pepper
1 tbsp fine sea salt

Milk Bread Burger Buns
makes 8 large buns

385g strong white bread flour
240ml whole milk
1 tsp fine sea salt
7g fast action dried yeast
3 tbsp caster sugar
60g unsalted butter, room temperature
2 large eggs

The day before you want to make these sandwiches we are going to prep the chicken. Into a bowl add the flour and cornflour (this starch helps make a super crisp batter) and mix together. In a small bowl add all of the seasonings and mix together. Add half of this seasoning mix to the flour mixture and stir to combine. Cover this and set aside for the moment.  In a large bowl pour in the buttermilk and hot sauce and mix in the remaining spice mixture.

Place the chicken breasts between two pieces of clingfilm and use a rolling pin to bash so that each piece is evenly thick, about 2cm thick. Place the chicken into the buttermilk, cover the bowl and refrigerate overnight. You can do this for less time of you want but I prefer to let this go at least 8 hours. This buttermilk mixture is a lot so you can add more chicken to it if you want to serve a few more people, just make sure the chicken is fully coated. If using more than 4 breasts a good way to do this is to add everything to a large ziplock bag so everything can be coated more easily than in a bowl. 

For the bread place 4 tbsp of the flour and about 80ml of the milk into a small saucepan and place over medium heat. Cook, stirring constantly, until the mixture becomes a thick gluey paste. Immediately scrape this into a small bowl and set aside for the moment. If you don’t immediately make the bread dough you’ll want to cover this so the paste doesn’t form a skin.

Place all of the bread dough ingredients, including the paste, into the bowl of a stand mixer, fitted with the dough hook, and knead on low/medium speed for about 10-15 minutes or until the dough is clearing the sides of the bowl and is smooth and elastic. The dough should also pass the window pane test at this stage. Place the dough into a bowl and cover, setting aside until doubled in size, about an hour.

buns.jpg

Knock back the dough and divide into 8 equal sized pieces, forming each into a neat ball of dough. Place the buns onto two parchment lined baking trays and lightly cover, setting aside until almost doubled in size, about an hour. To test the buns are ready to bake you can poke one of the buns with a floured finger. If the dough springs back slowly and not all the way it is ready. If the dough springs back quickly and completely the dough needs longer, if the dough doesn’t spring back at all it is likely over-proofed. 

20 minutes or so before the buns are ready to bake preheat to oven to 210ºC (190ºC fan).

Brush the risen buns with a beaten egg and then bake in the preheated oven for about 20 minutes or until a deep golden brown. Remove and set aside to cool. As the buns cool you’ll notice they wrinkle a little and become little soft squidgy pillows. This is an effect of the tangzhong method and is an indication you’ve made incredibly fluffy buns. 

For the fried chicken we need to fill a saucepan 1/2-2/3 full of vegetable oil and heat over medium heat until it reaches 170ºC. If you have a deep fryer you can of course use this instead. Whilst coming to temperature we can finish the prep for the chicken. 

Tip the flour into a wide shallow container (a rimmed baking sheet or roasting dish works well). Spoon a little of the buttermilk mixture into the flour and stir to combine. These add little extra crunchy bits of batter to your fried chicken. Using tongs lift the chicken breasts from the buttermilk, letting any excess drain back into the bowl, and lay in the flour mixture, turning so that both sides are well covered. 

Carefully lower the chicken into the hot oil and cook for about 7-8 minutes or until golden brown. If the chicken is browned much before this you may want to check the internal temperature to make sure the chicken is fully cooked through (this would be 75ºC). Remove the chicken from the oil and set on paper towels to absorb any excess oil.

To serve slice a bun in half and serve with with spicy mayo, pickles, shredded lettuce and whatever other toppings you prefer. 

In Breads and Quickbreads Tags tangzhong, milk bread, fried chicken, fried chicken sandwiches, buttermilk
2 Comments
  • Recipes
  • Older
  • Newer

Twitter

  • Was 8 original films, 3 spin off films, a two part play not enough. Can we have something new. https://t.co/cBZdGEGeyv
    Apr 4, 2023, 1:46 PM
  • RT @deliciousmag: Cacio e pepe, but make it buns! These seriously cheesy bread rolls from @TheBoyWhoBakes are inspired by his favouri… https://t.co/oDZlaDgnN2
    Apr 2, 2023, 11:08 AM
  • RT @TheDailyShow: Congrats to Donald Trump on finally winning a majority of votes! https://t.co/ezP55HZgl0
    Mar 31, 2023, 12:43 AM

Instagram

This weeks bonus recipe, for subscribers to my newsletter, is this gorgeous sour cherry and coconut gateau basque. The crust is a buttery cross between pastry and cake, think a cakey cookie. The filling is a layer of sour cherry topped with a rich coconut custard. A real fun one to make too! Link to my newsletter can be found in my bio - #gateaubasque #pastrycream #coconut #sourcherry
In this months @olivemagazine (out today) the team came and photographed my petit kitchen and we talked about how we put our stamp on the place, without spending a fortune. We hated the bland kitchen that we inherited but, as it was relatively new an
In this months @olivemagazine (out today) the team came and photographed my petit kitchen and we talked about how we put our stamp on the place, without spending a fortune. We hated the bland kitchen that we inherited but, as it was relatively new and in good condition, it felt a waste to rip it out and we also didn’t want to spend the money it would take to rip out the whole thing and replace it (it’s a howdens shell so we could have done something cheaper like @plykeakitchens @holte.studio @madebyhusk) so instead I painted all of the cabinets, using @makeitrustoleum kitchen cabinet paint, to give it some personality and lighten the whole thing. Check out the magazine for the full run down. - #kitchendesign #kitchenremodel #rustoleumcabinettransformations #rustoleumkitchencupboardpaint #kitcheninspiration #theboywhobakes #olivemagazine
Are you making scones all wrong? Maybe, maybe not? But I do want to show you how I make them! This recipe is based on the method I learnt at @belmondlemanoir 12 years ago when I did a stage, and it makes the absolute lightest scones. And shock horror, it involves kneading the dough, albeit very lightly. You can get the full recipe in this weeks newsletter (free) linked in my bio. - #scones #bakingday #worldbakingday #afternoontea #hightea #englishscones #clottedcream #creamtea #theboywhobakes
facebook
  • Contact

The Boy Who Bakes

Edd Kimber

facebook