The Boy Who Bakes

Edd Kimber
  • Home
  • Recipes
  • My Books
  • Blog
  • Recipe Index
  • About
  • Home
  • Recipes
  • My Books
  • Blog
  • Recipe Index
  • About

Recipes

  • All
  • baking
  • Biscuits and Cookies
  • Breads and Quickbreads
  • Bundts
  • Cakes
  • Chocolate
  • Dessert
  • drinks
  • Holidays
  • Pastry
  • Scones and Quickbreads

Double Chocolate Loaf Cake with Whipped Caramelised White Ganache

Edd Kimber April 11, 2022

THIS POST IS SPONSORED BY DOVES FARM

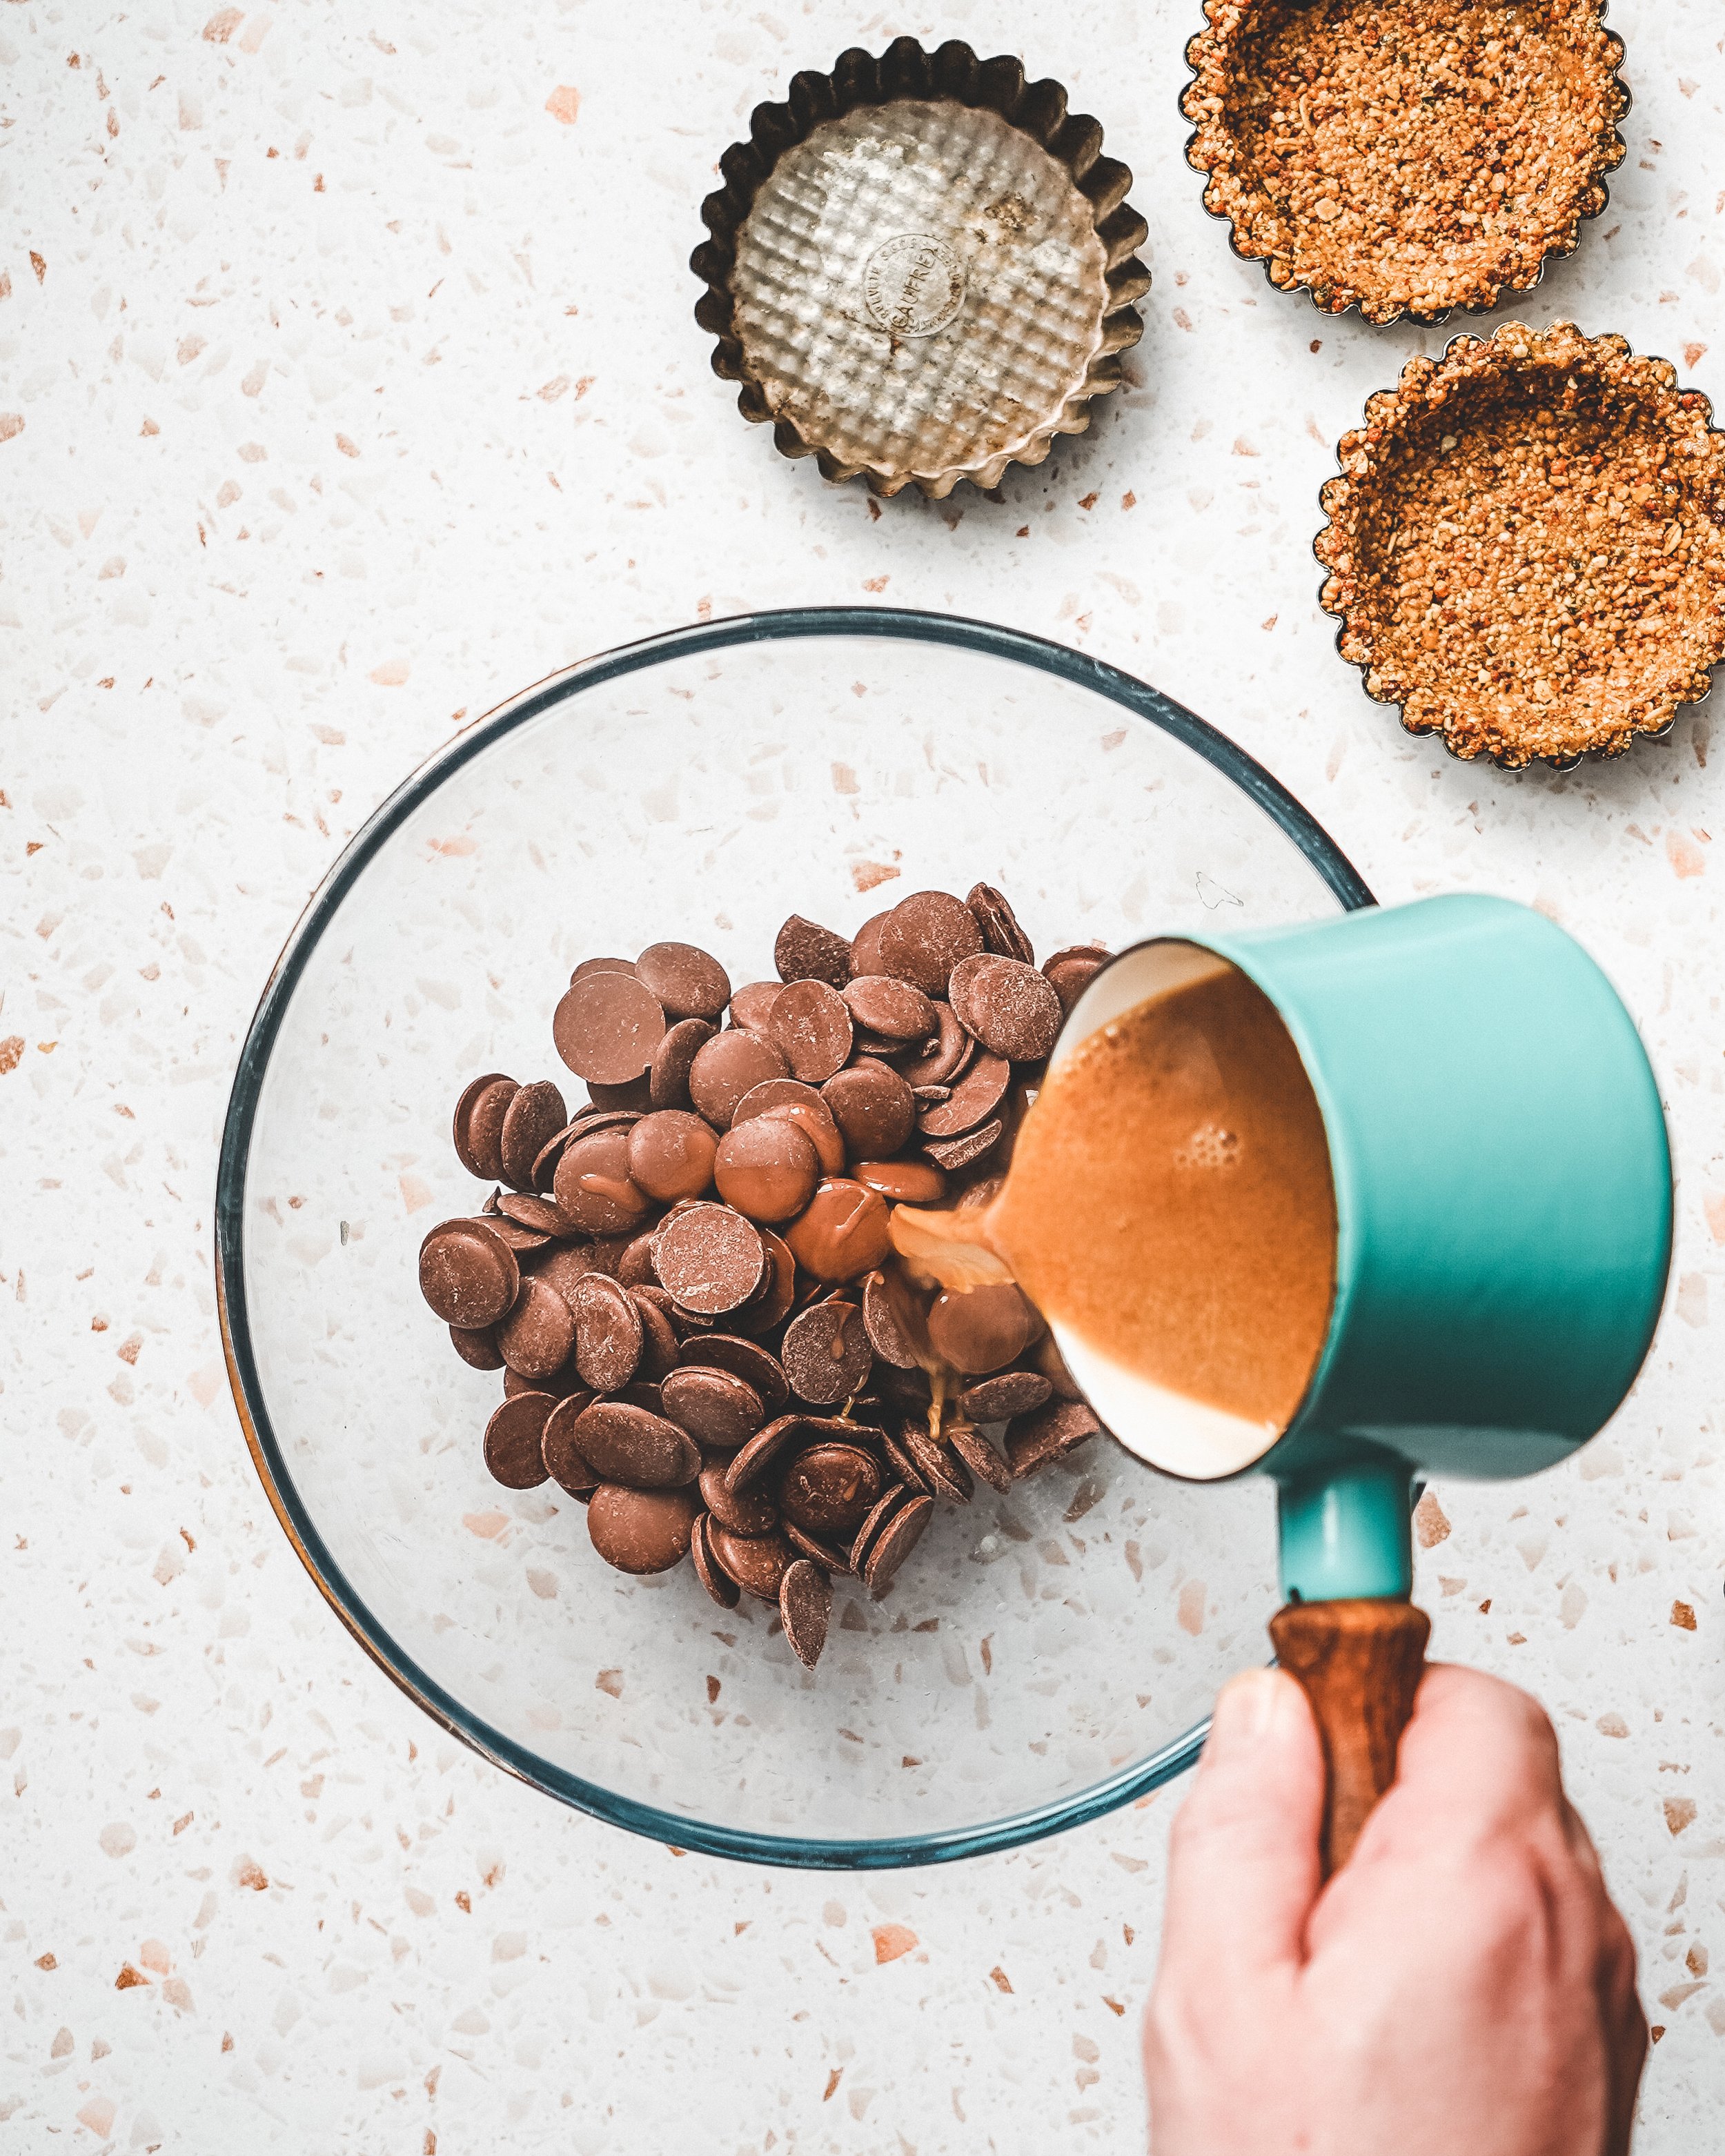
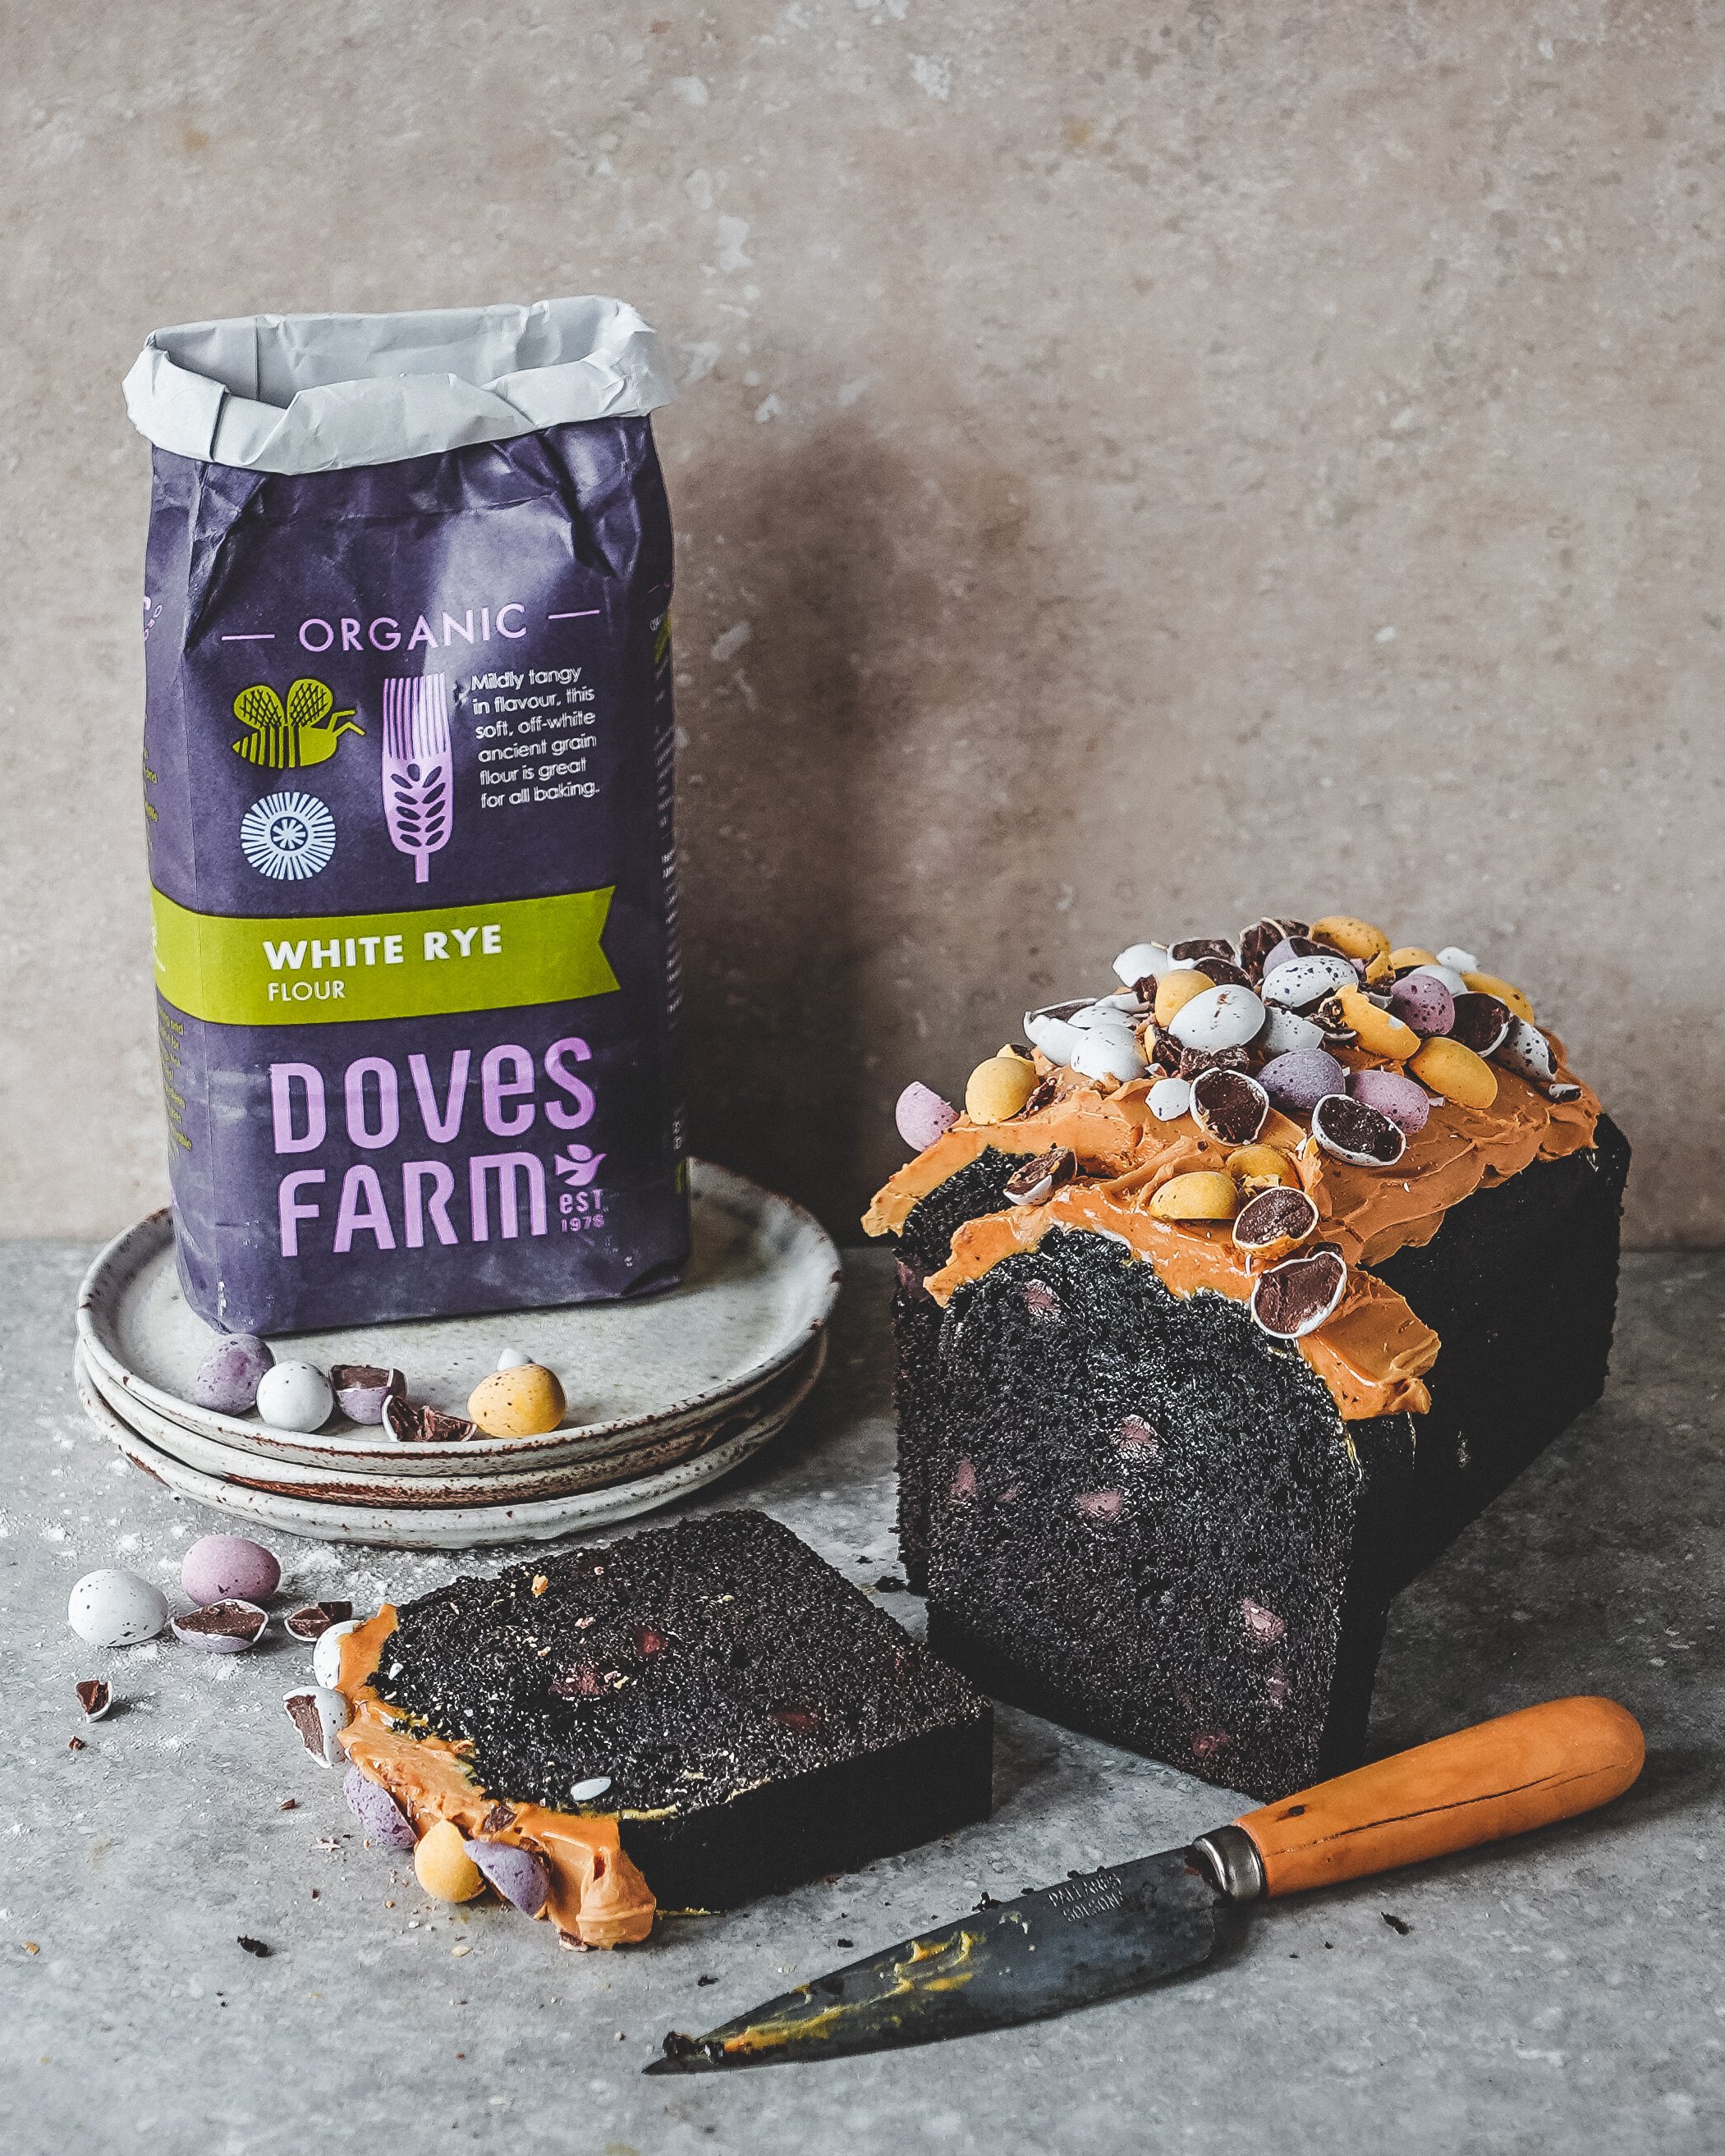
Easter and Chocolate, it is a match made in heaven, or maybe just an excuse to enjoy more chocolate. Either way I couldn’t let the holiday pass without a very special chocolate recipe for you all. I wasn’t in the mood for anything too complicated but I did want a big hit of flavour, high impact, low effort. This bakery style loaf is dense but tender and has a rich chocolate flavour backed up with some Doves Farm Organic White Rye Flour. Wholemeal rye flour, which you may have seen me use many times before, especially paired with chocolate, has a strong tangy rye flavour and the added texture that comes with wholemeal flours. For this cake I wanted something that backed up the chocolate flavour but didn’t add as much of its own flavour, more of a team player than the star of the show if you will. For the frosting I went with a very simple whipped caramelised white chocolate ganache, topped with chopped mini eggs (it’s easter, they’re mandatory). If you’ve never made this type of chocolate before you can learn how to make it here, or you could just buy it.

Doves Farm Organic White Rye has a creamy off-white colour and a mild tangy flavour that is amazing in this cake. I call it a bakery style loaf, partly because it’s a large loaf but also because it’s a dense but tender loaf, it’s like if a British tea shop cake met an American pound cake and had loaf shaped baby. The rye flour adds a subtle tang which helps intensify the chocolate flavour and also helps gives this cake its characteristic texture. When you bake with rye, especially if you are substituting it for regular wheat flour, you’ll notice it absorbs more liquid than wheat flour. In this cake for example I have made versions with regular plain flour and a rye version and the latter was a noticeably thicker batter when made to the exact same recipe. To compensate for this, I have included a little more moisture than if making it with plain flour. As a general piece of advice, when it comes to alternative/ancient grains such as rye, when adding them into your baking it’s a good idea to start with a smaller amount and see how it affects your recipe. Generally if I am adding some to an existing recipe I would sub in 25% of the grain and this normally adds a new depth of flavour without changing the texture of the finished bake in any dramatic way. After that point you can add more of the grain should you think you’d like more of the flavour and if it hasn’t affected the texture in any negative way. In this cake for example I ended up using a 50% wheat flour cocoa powder mix and 50% Doves Farm Organic White Rye Flour for the perfect balance of flavour and texture. 

Doves Farm are a family owned British organic flour and food company, founded in 1978. Their Organic White Rye Flour is available direct from www.dovesfarm.co.uk or from Ocado, Sainsbury’s or Tesco. 

Double Chocolate Loaf Cake with Whipped Caramelised White Ganache
Serves 10-12

125g unsalted butter, diced
150g caster sugar
150g light brown sugar
5 large eggs
125ml sour cream
75ml strong black coffee
100g plain flour
50g cocoa powder (dutched/black)
150g Doves Farm Organic White Rye Flour
1 1/2 tsp baking powder
1/2 tsp fine sea salt
150g dark chocolate chips

Whipped Caramelised White Chocolate Ganache
150g caramelised white chocolate, finely chopped
75ml double cream
Chocolate mini eggs, roughly chopped, for decoration

@theboywhobakes When caramel meets chocolate #caramelizedwhitechocolate #caramel #bakinghacks #SixNationsRugby #JDAirMaxMode #GameTok #fypシ #tiktokbaker #chocolatelover #chocolaterecipe ♬ Why Are There Boundaries - FKJ
@theboywhobakes Whipped caramelised white chocolate ganache #caramelizedwhitechocolate #whippedganache #SixNationsRugby #JDAirMaxMode #caramel #fypシ #tiktokbaker #chocolatelover #chocolaterecipe #ganache ♬ Orange Juice - Tomppabeats

To make the cake you’ll need a loaf pan that measures 9x4x4 (the type I prefer is known as a small Pullman pan and is available here). If you only have a traditional 1lb loaf pan (the type normally called for in a loaf recipe) you can make a batter 3/5’s of the above recipe and bake for about 45 mins.

Preheat the oven to 180ºC (160ºC Fan) and lightly grease your loaf pan and line with a strip of parchment paper that overhangs the long sides of the tin, securing in place with metal binder clips.

Place the butter in a small saucepan and place over low/medium heat and cook until the butter is fully melted. Remove from the heat and set aside for the moment. 

In a large bowl add the sugars and eggs and using an electric mixer whisk together for a minute or two until fully combined. Add the sour cream, and coffee and whisk briefly to combine. In a separate bowl whisk together the plain flour, cocoa powder, Doves Farm Organic White Rye Flour, baking powder and salt. As we are using both light brown sugar and cocoa powder it is advisable to sieve this mixture as both of these ingredients have a nasty habit of clumping. Add the dry goods to the egg mixture and use a balloon whisk to gently stir the batter together. Pour in the cooled melted butter and fold with the whisk until combined. Add the chocolate chips and very briefly mix into the batter. Be careful to only mix as needed, cakes with rye flour can become gummy if mixed for too long. Scrape the batter into the prepared loaf pan and bake in the preheated oven for about 60 minutes or until a skewer inserted into the cake comes out clean. Remove the pan from the oven and set aside for 20 minutes before carefully unfolding and setting onto a wire rack to cool completely. To ensure the crust of the cake is tender and hasn’t dried out, whilst the cake is still warm cover with a clean kitchen towel. The warmth of the cake is caught by the towel and slightly steams the outside of the cake helping ensure it stays tender.

For the ganache place the chocolate and the cream into a small bowl and place over a pan of simmering water. Stir occasionally until the chocolate has fully melted. Remove from the heat and stir until you have a smooth silky ganache. Refrigerate for up to 30 minutes or until the ganache has thickened up but is still spreadable. Remove from the fridge and using an electric mixer whisk the ganache until it turns into a pale and fluffy cream like texture. Spread this over the top of the cake and decorate with the chopped mini eggs.

Kept covered this cake will keep for at least 3 days.

In Cakes Tags chocolate cake, loaf cake, chocolate, rye flour, rye, chocolate chips, caramelised white chocolate, caramelized white chocolate, easter
3 Comments

Chocolate Passion Fruit Brioche Buns

Edd Kimber March 22, 2022

Is there a flavour pairing you go back to time and time again, something you just cant get enough of? Chocolate and mint, matcha and white chocolate or maybe pear and ginger? For me the pairing is the joyous matching of chocolate and passion fruit (works brilliantly with both milk and dark chocolate but milk is what I normally go for). I first tried this pairing in a macaron at famed pastry chef, Pierre Herme’s, Parisian boutique. It just works, the brightness of the passion fruit and the rich creaminess of the milk chocolate, I will never bore of it. 

For these brioche buns I drew inspiration from the flavour combo and a form from Aroma Bakery in London, who make a brioche filled with cream and dipped in chocolate. These buns are flavoured with a little lemon zest filled with a passion fruit pastry cream lightened with a little whipped cream. The finished buns are dipped in a thin milk chocolate ganache that has been spiked with a little extra passion fruit puree. 

Before we get to the recipe a quick note on passion fruit. They are expensive, at least here in the UK, especially considering how many you often need to get the need amount of puree for a recipe. So whilst I generally like using fresh fruit in recipes that use a lot of passion fruit I splurge on passion fruit puree, which is sold in cartons. Yes you have to buy these online (or a good alcohol shop if you have one close by, this is where I get it in London) and they only come in litre sized packs, it does however work out significantly cheaper than buying the fresh fruit. If you love using passion fruit in baking this is my preferred method, for ease and for value. It is also worth noting you can also freeze the puree you don’t use and save it for a later purpose. 

Chocolate Passion Fruit Brioche Bun
Makes 8

Brioche
250g strong white bread flour
1/2 tsp fine sea salt
1 tsp fast action dried yeast
20g caster sugar
Zest of 1 lemon
125ml whole milk
1 large egg, plus one for egg wash
50g unsalted butter, room temperature

Passion Fruit Pastry Cream
225ml passion fruit puree
75g caster sugar
20g cornflour
3 large egg yolks
Pinch of fine sea salt
20g unsalted butter
100ml double cream
1 tsp vanilla bean paste

Chocolate Glaze
50g milk chocolate (I like a dark milk chocolate, something around 50% cocoa solids)
50ml double cream
15ml passion fruit puree

The day before you want to bake these buns make the brioche and the pastry cream. For the brioche place 20g of the flour and 80ml of the milk into a small butter pan and cook over medium heat, stirring with a small whisk or spatula, until the mixture cooks into a thick paste. Scrape into a small bowl and set aside for the moment. 

In the bowl of a stand mixer add the remaining flour, salt and yeast and whisk to combine. Add the sugar and lemon zest to a small bowl and use your fingers to rub together until the sugar resembles moist sand and you can smell the aroma from the lemon. Add this to the bowl along with the remaining milk and egg, and the cooked flour mixture. With the dough hook attached mix on low speed until the mixture forms a shaggy dough. Continue mixing for 10-15 minutes or until the dough no longer sticks to the sides of the bowl. Add the butter a little bit at time until all of it has been added. Continue mixing on low speed until the butter has been combined and the dough is once again no longer sticking to the sides of the bowl and has formed a ball of dough around the dough hook. The finished dough should have a slight sheen and be stretchy and elastic. Scrape the dough onto the worksurface and form into a ball. Place into a bowl and cover with clingfilm and refrigerate overnight until ready to use (the dough can be stored in the fridge for a couple days before using). 

To make the pastry cream place the passion fruit puree into a saucepan with half of the sugar. Place the pan over medium heat and bring to a simmer. Meanwhile, in another bowl, mix together the remaining sugar and cornflour. Add the egg yolks and salt and whisk together until smooth. When the puree is simmering pour over the yolk mixture, whisking as you pour to prevent the yolks from scrambling. Pour the custard back into saucepan and place back over medium/high heat and cook, whisking constantly, until the custard comes to a boil and is thick. Immediately scrape the custard into the bowl, add the butter and stir until fully combined. Press a sheet of clingfilm onto the surface of the custard and refrigerate until needed. The custard can be stored in the fridge for 2-3 days before using. 

On the day you want to bake the buns remove the dough from the fridge and divide into 8 equal sized pieces. Form the dough into neat round buns and place them on a large parchment lined baking tray. Cover the buns lightly with clingfilm and set aside for about 60-90 minutes or until the buns have almost doubled in size. Just before they have finished proofing preheat the oven to 200ºC (180ºC Fan). Lightly beat the remaining egg with a fork and brush each bun with the egg wash. Bake in the preheated oven for about 15-20 minutes or until the buns are golden. Remove and set aside to cool. 

For the pastry cream remove the bowl from the fridge and beat the custard until smooth and lump free. In a separate bowl beat the cream and vanilla until it holds soft peaks. Add the cream to the custard and fold together until smooth and fully combined. 

Using a skewer, poke a hole in the bottom of each bun. Scrape the custard into a piping bag fitted with a Bismarck piping tip (you can use whatever thin round piping tip you have but anything doughnut-like is much easier with a bismarck tip). Pipe in as much custard as each bun will take before it squeezes out. Once filled the buns should feel a little heavy, if they feel light they need more custard. 

For the glaze melt together the cream and chocolate until fully melted and a smooth ganache is formed. Scrape the ganache into a small bowl and whisk in the passion fruit puree. Dip the buns into the ganache, allowing any excess to dip back into the bowl. Place back onto the baking tray and set aside until the ganache is set. If you want to can decorate the buns, either with a little grated chocolate like Arome do with their buns, a little cocoa powder or a little freeze dried passion fruit powder as I did. 

Kept covered these buns will keep for 2-3 days. 

In Breads and Quickbreads Tags passion fruit, brioche, chocolate, ispahan, arome, pierre herme, buns
2 Comments

Roasted Garlic, Cheddar and Rosemary Sourdough Loaf

Edd Kimber March 17, 2022

Is there anything better than the aroma of fresh bread filling the house? Maybe the aroma of this particular loaf, a sourdough loaded with roasted garlic, chunks of mature cheddar and lots of rosemary. As the bread bakes the cheese slowly caramelises, filling your kitchen with the aroma of freshly made toasted cheese sandwiches, pure comfort and better than any scented candle you could imagine. 

I have made versions of this loaf multiple times now but always devour it so quickly that I’ve never quite gotten around to writing it up so I made another loaf, just for quality control of course, and this time I actually measured out everything I put into the loaf. To make the bread you need a sourdough starter and if you’ve already made my basic sourdough loaf your in for a treat. This recipe is a simple adaption of that recipe and follows the same basic patten, the only real difference is the way the additional ingredients are incorporated into the dough. 

Roasted Garlic, Cheddar and Rosemary Sourdough Loaf

Mix-Ins

1 large head of garlic
Olive oil
Flaked sea salt
125g mature cheddar, in small dice
3 springs of rosemary, leaved finely chopped

Sourdough Recipe

Levain
25g mature starter (my starter is 100% hydration)
50g 50/50 flour blend (my blend of white and wholemeal bread flours used for the starter)
50ml water at 27C

Dough
100g levain
450g white bread flour
50g wholemeal flour
375ml water at 27C
10g salt

9am - Make the levain

The levain needs to double in size to be ready to bake with. A healthy starter fed at a ratio of 1:2:2 should happily double if not triple in size within 4-5 hours if stored around 25-27ºC.

12pm - Autolyse

An hour before the levain is finished rising, we mix together the flour and water (keeping back 25ml for a later use). To do this we don’t need to knead the dough, or develop the gluten, we just want to hydrate the flour. Squeeze the mixture through your fingers, until everything is moistened, scrape any dry bits from the side of the bowl and then cover the bowl and pop it the oven alongside the levain until it finishes doubling. 

The purpose of the autolyse is to fully hydrate the flour, to make a dough that is extensible which is to say nice and stretchy. 

1pm - Mix-In Prep

When the levain and autolysed dough are almost finished prep your mix-in ingredients. Peel away most of the outer papery layers from the bulb of garlic and slice off the top. This cut should just be deep enough that the top of each clove of garlic is exposed. Place the garlic onto a piece of foil and drizzle over a little olive oil and sprinkle with a little flaked sea salt. Wrap the garlic in the foil and place onto a baking tray. With the oven preheated to 200ºC (160ºC Fan) roast the garlic for about 45-60 minutes or until the garlic is soft and a rich golden colour. Set aside to cool. In a bowl mix together the rosemary and cheddar. 

2pm - Bulk Fermentation

Bulk fermentation is the first rise of the bread and it is where the strength, where the gluten, is mainly going to be developed (the autolyse starts this process off). Unlike a traditional bread dough that is kneaded, sourdough, at least this method, is relatively hands off.

Before we mix everything together, test that the autolyse is ready by doing a float test. The recipe for the levain makes a total of 125g and we only need 100g for the dough itself, the rest is for this stage. Take a teaspoon of the the levain and pop it into a bowl of water. If it floats the mixture is full of gas and is ready to bake with, if it doesn’t we need to leave it a little longer. 

Scrape 100g of the levain on top of the autolysed dough and use your fingers to dimple it into the dough. We want to fully distribute the levain so once the dimpling stops working I start folding the dough on itself until it feels more uniform. Leave the dough for 15 minutes before adding the salt. 

Sprinkle the salt over the dough and use that last 25ml water to pour on top of the dough to help the salt dissolve. Repeat the dimpling and folding process until the salt is distributed. At this stage the dough will separate a little due to the added water but just keep folding the dough until it becomes uniform. As with the levain I like to keep the dough in the oven for the whole bulk to control the temperature.

The bulk should take a total of 4-5 hours depending on the temperature the dough rests at, and how warm the water you used was, and during that period you only have one job and that is to strengthen the dough. We do this via stretch and folds and something called coil folds.

For the first fold you will preform a classic stretch and fold, lifting and gently stretching the dough and folding it back on itself, doing this four times around the edges of the dough. Rest the dough for 30 minutes before preforming the second set of stretch and folds, resting again for 30 minutes.  After this rest we will no longer preform stretch and folds, its time for to add the mix-ins. 

Very lightly oil your worksurface and scrape the dough out onto the worksurface. Gently stretch the dough out into a large thin rectangle, working slowly so you don’t rip the dough. Squeeze the garlic into a small bowl and use a fork to mash into a smooth paste. Using your fingers randomly dot the garlic over the dough and spread across the dough. Don’t worry if not every part of dough has garlic on it, just make it’s nicely distributed. Sprinkle over the cheddar mixture and gently press so it sticks to the dough. Fold the dough in thirds, as if folding a letter, encasing the mix-ins inside the dough. Roll the dough up and then place back into the bowl to continue bulk fermentation. Do another two sets of stretch and folds spaced 30 mins apart and then leave the dough to finish bulk fermentation. 

When evaluating if the dough has finished its bulk fermentation we are looking for a dough that has risen about 20-50% and shows clear signs of fermentation. This would mean a dough that jiggles when you rock the bowl gently and a dough that has bubbles on the top of the dough. Once thats achieved we are ready for shaping. 

Lightly flour the work surface and use a plastic dough scraper to tease the dough gently from the bowl. At this stage the underside of the dough is floured but the top is still sticky. Using lightly floured hands we are going to do a brief preshape. Go underneath the dough and fold it over itself multiple times as you go around the bowl, forming it into a rough circle. Turn the dough over and cover with a clean kitchen towel and leave to relax for 20 minutes. 

Whilst the dough is relaxing prepare you proving basket or bowl. If you using a traditional cane basket lightly dust with rice flour. Rice flour is your best friend and is wont be absorbed into the dough and helps the dough release easily from the basket. If you don’t have a basket you can use a mixing bowl. Line the bowl with a clean kitchen towel and dust that with flour.

To do the proper shaping lightly dust the top of the dough with flour and turn the dough over, using a metal bench scraper to help release it from the worksurface, turning it onto a non floured part of the work surface.

Think of the dough as a compass. Gently lift and stretch the east point of dough up and over towards the west. Gently lift and stretch the west point of dough up and over towards the east. Gently lift and stretch the north point of dough up and down towards the south. Finally gently lift and stretch the south point of the dough up and over towards the north. Turn the dough over so the seams are on the worksurface.

This rough shape now needs to be tightened up a little. Using both hands, which should remain in contact with the work surface the whole time, cup the dough and drag it towards yourself for a drag of about 15-20cm. The dough should drag along the work surface and you should feel the ball tighten up. Rotate the dough 90 degrees and repeat the dragging, doing this a few times until the dough is taught and round. Be careful at this stage as doing this too many times will tear the dough.

Carefully lift the dough and turn it into a proving basket, seams side up.

7.30pm - Proving

Pop the dough into the fridge and leave overnight

8.30am - Preheat The Oven

We are going to bake the bread in a cast iron pot, something like a large le creuset (I use a pot called a Challenger Bread Pan which I love for bread). We want it blisteringly hot so preheat it, as high as it will go, at least 250C, for a full hour.

9.30am - Baking

Take the dough from the fridge and carefully turn it out onto a crumpled piece of parchment. You can either leave the dough as it is or dust with little flour.

Using a bread lame or very sharp knife score a line across the top of the loaf (this helps to expand and open up fully as it bakes). 

Remove the cast iron pot from the oven and remove the lid. Cut away the remaining parchment and carefully transfer the loaf to the pan and place the lid back on. Bake in the preheated oven for 25 minutes. Baking the loaf in the pan helps to trap the moisture from the dough, creating steam so the crust is slow to form and the bread can rise to its full potential. Reduce the temperature to 220C and remove the lid and bake for a further 20 minutes or until the crust is nice and dark. As this loaf is loaded with cheese you want to keep an eye on it so that it doesn’t burn. Once browned remove the pot from the oven and carefully remove the loaf and set onto a wire rack to cool completely. 

Allow the bread to cool for at least an hour before cutting into it or you risk ending up with a gummy bread. 


In Breads and Quickbreads Tags sourdough, bread, cheddar, cheese, savoury, rosemary
6 Comments

No Bake Chocolate Tarts

Edd Kimber February 14, 2022

This post is sponsored by Lizi’s Granola

A well made chocolate tart is a thing of beauty, elegant and perfect for a valentines day treat. Made with a silky smooth chocolate filling and a thin crisp pastry base, it’s a delicious classic dessert. But what if you don’t have the time to make pastry or a baked chocolate filling? You make these no bake chocolate tarts, of course. In the place of the pastry a no-bake tart crust is made, with Lizi’s Granola, which adds both ease and speed but also a whole load of texture which is just fabulous to eat. For this particular recipe I chose the Lizi’s Original Nuts and Seeds Granola as the texture it provides made for a great tart base and most importantly a delicious flavour. The filling is a simple ganache made with almond milk and brown sugar for a warm toasty note that goes great with the chocolate and granola.

As you’ll see from the ingredients the recipe is vegan and whilst you could make swaps and switch in dairy if you’re not vegan I would encourage you to try it as written anyway. For the crust I like to use virgin coconut oil which has the flavour of coconut and adds a great layer of flavour to the whole dish. For the ganache I use an almond milk that has a hint of bitter almonds that adds to the nutty complexion of the dish. Dairy has stronger flavours so using a something more subtle like almond milk allows the full flavour of the chocolate shine through in the ganache.

When making the ganache it is important that the chocolate mixture ends up incredibly smooth and silky and to that end there a couple of guidelines to follow to ensure the perfect end result. Chop your chocolate nice and fine, this way the milk doesn’t need to be as hot to melt big chunks of chocolate. Bring the milk to a steam or just to a simmer but do not let it boil. Firstly some plant based milks do not like being boiled and they can split if they become too hot but most importantly the chocolate wont appreciate the milk being too hot. Ganache is an emulsion and the heat from the milk can cause the cocoa butter to separate leading to a split ganache. Once you have properly heated the milk you want to pour to over the chocolate and set aside for a few minutes before stirring together. This pause allows the chocolate to melt and the milk to cool down slightly so that when stirred together it forms a silky emulsified texture and you get the best possible texture for your tarts filling.

Whilst these tarts are incredibly easy to make they do need a little refrigeration time to get everything set so they are perfect made for a dinner party, or half the recipe to make a date night dessert perfect for you valentine. 

Note: to get 15% off your next order of Lizi’s Granola use the code theboywhobakes15 on lizs.co.uk 

No Bake Granola Chocolate Tarts
Makes 4

Tart Crust 
175g Lizi’s Original Nuts and Seeds Granola
80g coconut oil, room temperature
Pinch of fine sea salt

Vegan Ganache
265g dark chocolate, finely chopped
50g light brown sugar
115ml almond milk* 

To make the crust place the about 2/3 of the granola into a food processor, with the blade attached, and process until fine and crumbly. Add in the remaining granola, the oil and salt and process until everything is evenly combined and the mixture is clumped together. Divide this mixture equally between four loose bottomed 10cm tart tins and press firmly into the base and up the sides of the tin. 

Place the tart cases in the fridge whilst you work on the ganache. 

Ganache is most commonly made with chocolate and cream but for a vegan ganache I typically turn to a water ganache, a simple mixture of water and chocolate. Because the water has no flavour of its own the flavour of the chocolate is pure and unadulterated so with this style ganache its best to use a chocolate you absolutely love. For this particular recipe I am using a kind of hallway house between cream and water, almond milk which (depending on the brand you use) can add a subtle almond flavour to the ganache.

Place the chocolate into a bowl and set aside. Add the almond milk and sugar to the pan and gently heat until just steaming then pour over the chocolate and set aside for a couple minutes before stirring with a whisk until a silky smooth ganache is formed.

Pour the ganache into the chilled tart cases and place into the fridge until the ganache has set, a couple hours. 

Serve with a little vegan whipped cream or sour cream if you're not vegan.

Kept refrigerated these will keep for 3-4 days.

*you can you use any plant based milk for this recipe but I like using an almond or coconut version as both have flavours that can compliment chocolate.

In Chocolate, Dessert Tags no bake, tarts, granola, ganache, vegan baking, vegan
1 Comment
  • Recipes
  • Older
  • Newer

Twitter

  • Was 8 original films, 3 spin off films, a two part play not enough. Can we have something new. https://t.co/cBZdGEGeyv
    Apr 4, 2023, 1:46 PM
  • RT @deliciousmag: Cacio e pepe, but make it buns! These seriously cheesy bread rolls from @TheBoyWhoBakes are inspired by his favouri… https://t.co/oDZlaDgnN2
    Apr 2, 2023, 11:08 AM
  • RT @TheDailyShow: Congrats to Donald Trump on finally winning a majority of votes! https://t.co/ezP55HZgl0
    Mar 31, 2023, 12:43 AM

Instagram

This weeks bonus recipe, for subscribers to my newsletter, is this gorgeous sour cherry and coconut gateau basque. The crust is a buttery cross between pastry and cake, think a cakey cookie. The filling is a layer of sour cherry topped with a rich coconut custard. A real fun one to make too! Link to my newsletter can be found in my bio - #gateaubasque #pastrycream #coconut #sourcherry
In this months @olivemagazine (out today) the team came and photographed my petit kitchen and we talked about how we put our stamp on the place, without spending a fortune. We hated the bland kitchen that we inherited but, as it was relatively new an
In this months @olivemagazine (out today) the team came and photographed my petit kitchen and we talked about how we put our stamp on the place, without spending a fortune. We hated the bland kitchen that we inherited but, as it was relatively new and in good condition, it felt a waste to rip it out and we also didn’t want to spend the money it would take to rip out the whole thing and replace it (it’s a howdens shell so we could have done something cheaper like @plykeakitchens @holte.studio @madebyhusk) so instead I painted all of the cabinets, using @makeitrustoleum kitchen cabinet paint, to give it some personality and lighten the whole thing. Check out the magazine for the full run down. - #kitchendesign #kitchenremodel #rustoleumcabinettransformations #rustoleumkitchencupboardpaint #kitcheninspiration #theboywhobakes #olivemagazine
Are you making scones all wrong? Maybe, maybe not? But I do want to show you how I make them! This recipe is based on the method I learnt at @belmondlemanoir 12 years ago when I did a stage, and it makes the absolute lightest scones. And shock horror, it involves kneading the dough, albeit very lightly. You can get the full recipe in this weeks newsletter (free) linked in my bio. - #scones #bakingday #worldbakingday #afternoontea #hightea #englishscones #clottedcream #creamtea #theboywhobakes
facebook
  • Contact

The Boy Who Bakes

Edd Kimber

facebook