The Boy Who Bakes

Edd Kimber
  • Home
  • Recipes
  • My Books
  • Blog
  • Recipe Index
  • About
  • Home
  • Recipes
  • My Books
  • Blog
  • Recipe Index
  • About

Recipes

  • All
  • baking
  • Biscuits and Cookies
  • Breads and Quickbreads
  • Bundts
  • Cakes
  • Chocolate
  • Dessert
  • drinks
  • Holidays
  • Pastry
  • Scones and Quickbreads

Sourdough NY Style Bagels

Edd Kimber May 12, 2022

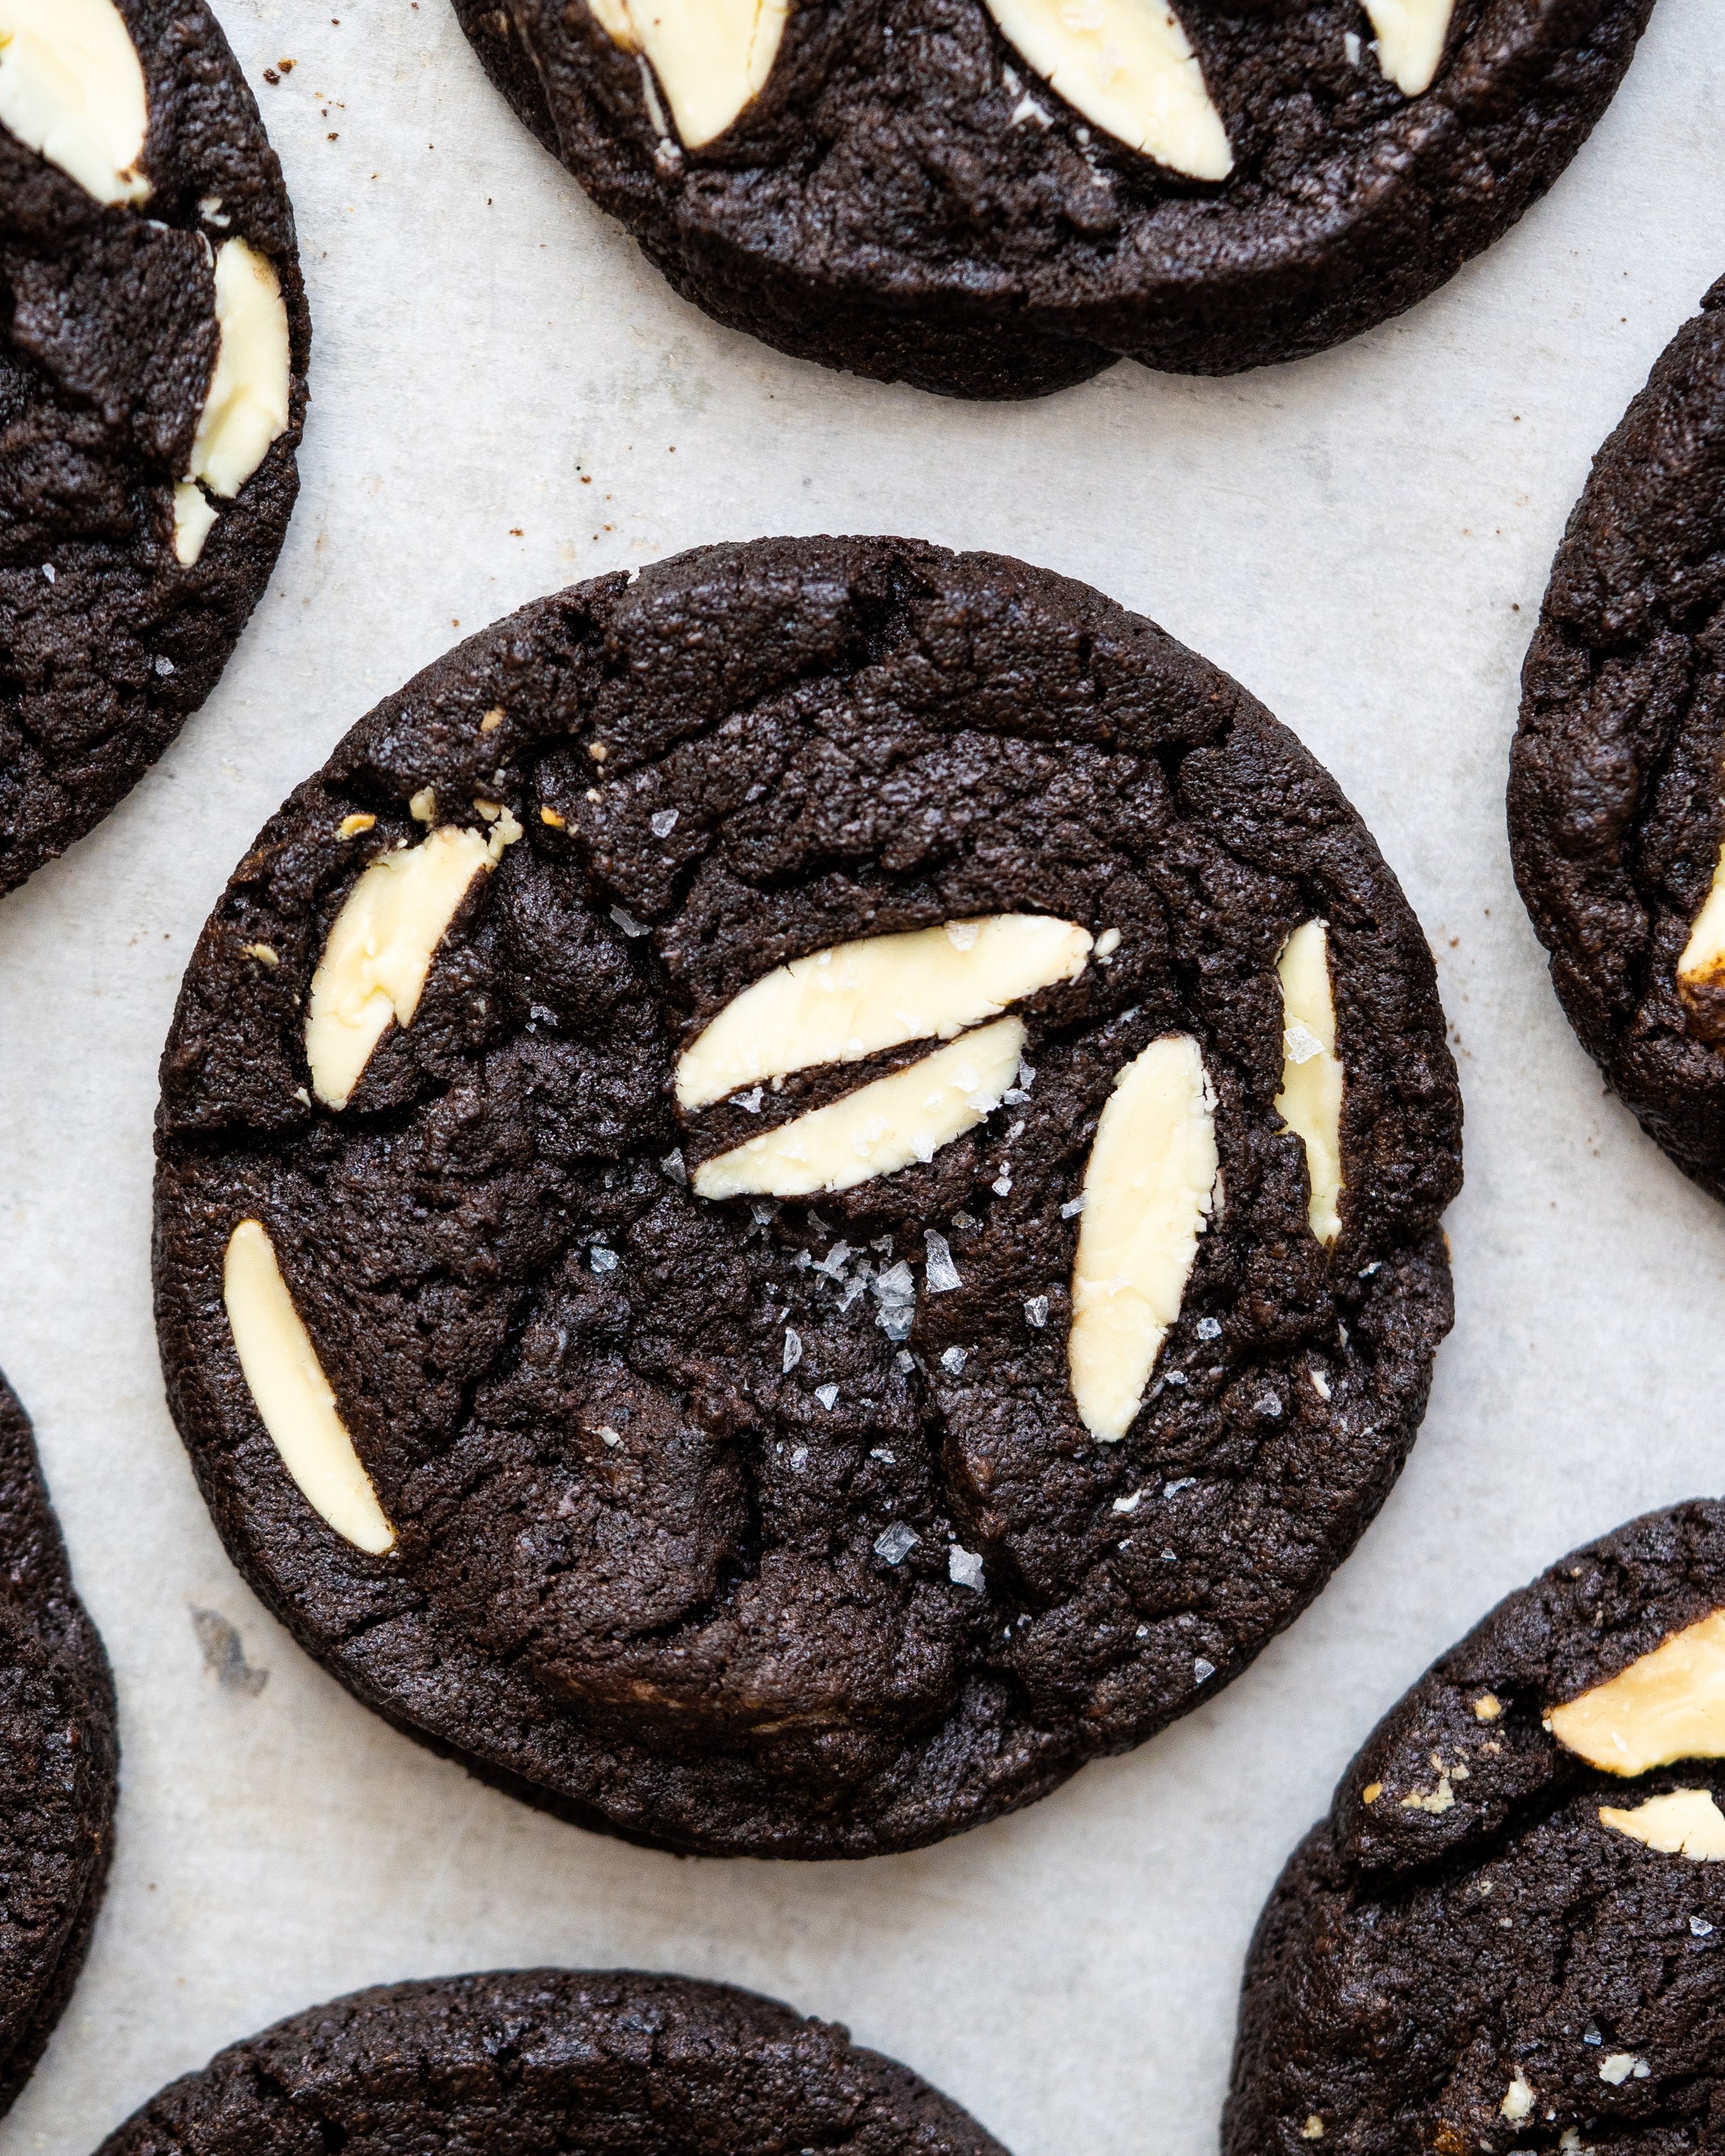
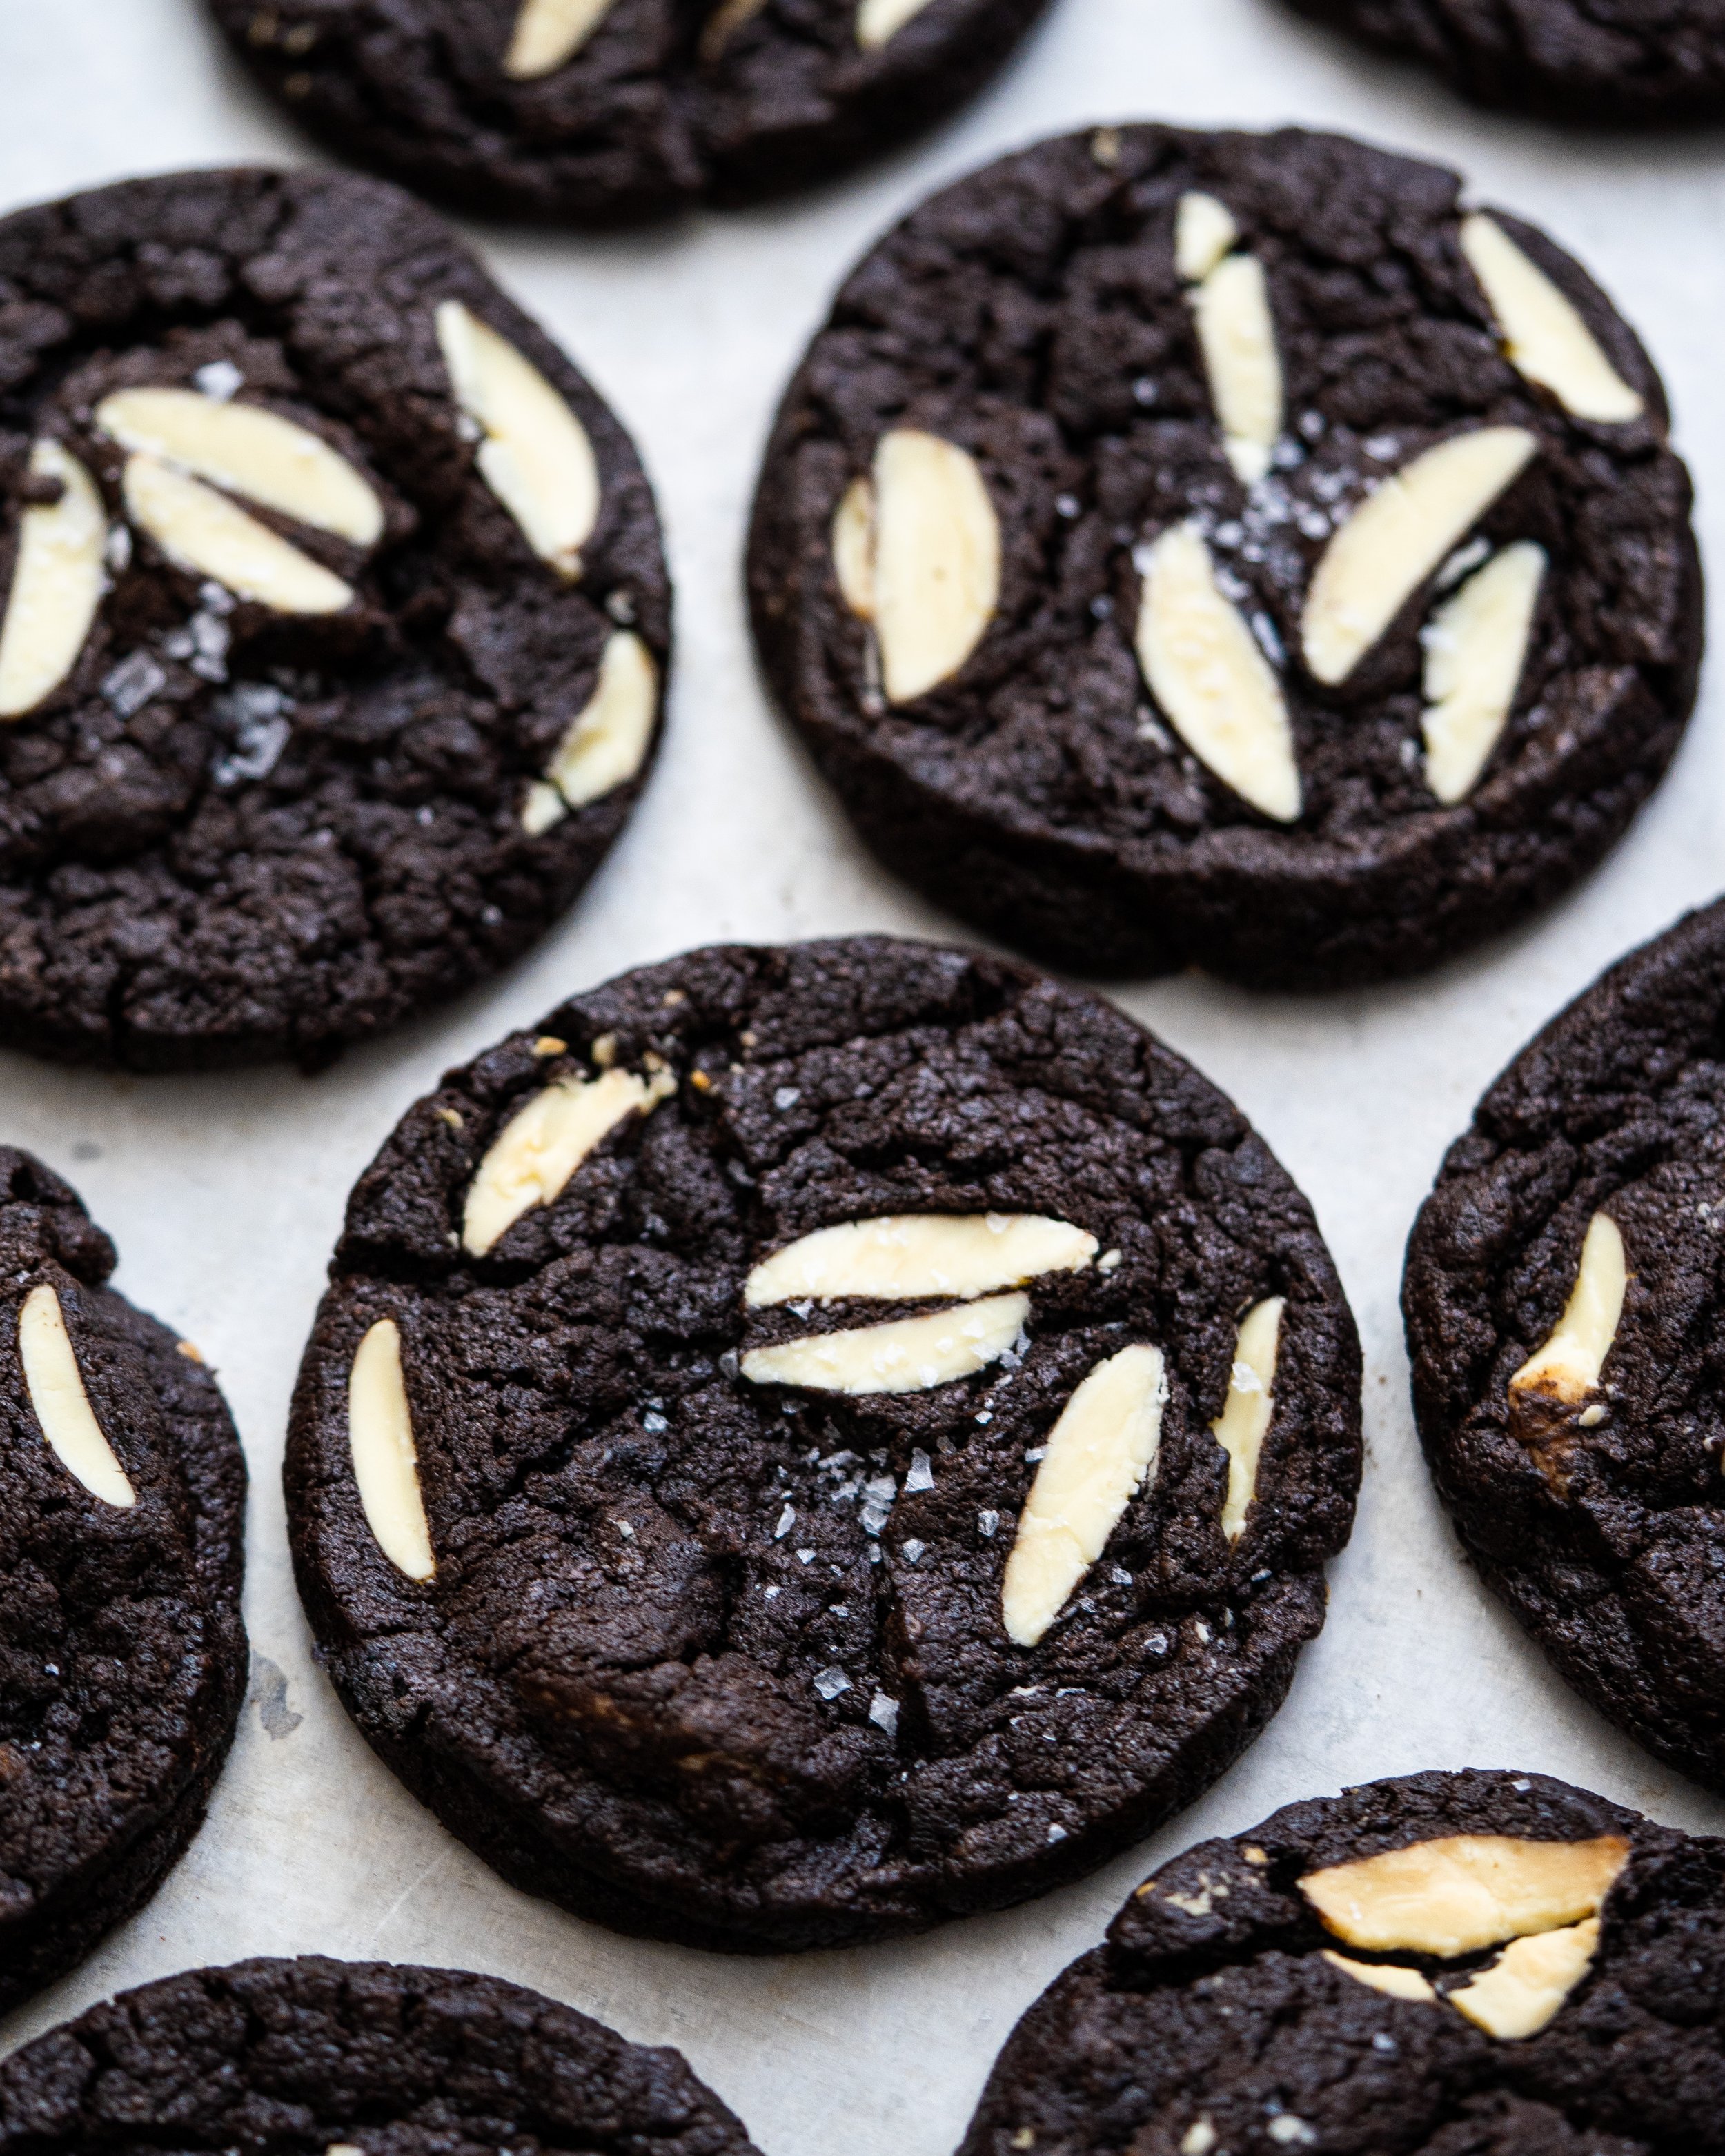
I love making bread for many reasons, its meditative, its relaxing and it’s fun. But of course the main reason I enjoy it, is the eating. There are few things better than a slice of freshly baked homemade bread. Whether its sourdough or yeasted, a country loaf or brioche buns, homemade bread whilst still just a little warm is so gratifying and so utterly delightful. One of my favourite breads to make is the New York style bagel. Boiled and baked they have a great chewy texture and a wonderful flavour. You can find my yeasted recipe here but today we are talking about sourdough bagels.

To work on this recipe I tested multiple batches of bagels and a few different methods of making them. Initially I worked on simply switching out the yeast in my old recipe for sourdough starter. I bulk fermented the dough then knocked it back and formed the dough into bagels before retarding them overnight in the fridge. Even though this worked great with my yeasted bagels for some reason it simply didn’t work with sourdough. The method I settled on was basically the same just switching up when we retard the dough. I made the dough, let it proof for a couple hours then transferred it to the fridge and retarded it overnight. In the morning I divided the dough formed it into bagels and proofed it for about an hour before boiling and baking.

Three big bits of advice before we get to the recipe. First thing you should know when making this recipe is that bagels require a very strong starter, if the starter is sluggish the bagels wont rise properly and can end up flat and too dense. The dough has a low hydration and the starter needs to work harder to proof the dough. The second thing is that the dough needs a lot of strength. To knead the dough you can use your mixer but be aware that this dough is going to put your mixer through the ringer, so much so that I would suggest if you have domestic stand mixer you may want to knead this by hand.

Sourdough New York Style Bagels
Makes 8

175g sourdough starter, recently doubled (or preferably tripled)
250g lukewarm water
1 tbsp barley malt syrup*
10g fine sea salt
500g strong white bread flour

To Boil
2 tbsp barley malt syrup
1 tbsp bicarbonate of soda

*barley malt syrup is a traditional flavouring in NY bagels but it isn’t commonly available from supermarkets. You’ll find it easily in health food stores or of course multiple places online. If you don’t want to buy the syrup you can use honey but the flavour wont be the same.

To make the dough place the starter into a large bowl and pour over the water and malt syrup and whisk together, breaking it up and dissolving the starter slightly. Add the salt and whisk in briefly. Add the flour and mix together to form a shaggy mass. Turn out and knead on the worksurface for around 12-15 minutes or until smooth and elastic. This dough is pretty dense and kneading it is a workout but persevere, the dough needs a lot of gluten development and you’ll be rewarded with a batch of wonderful bagels.

Form the dough into a ball and place into a lightly oiled bowl, turning to coat evenly in the oil. Cover the bowl and set aside for an hour, before transferring to the fridge overnight or up to 24 hours.

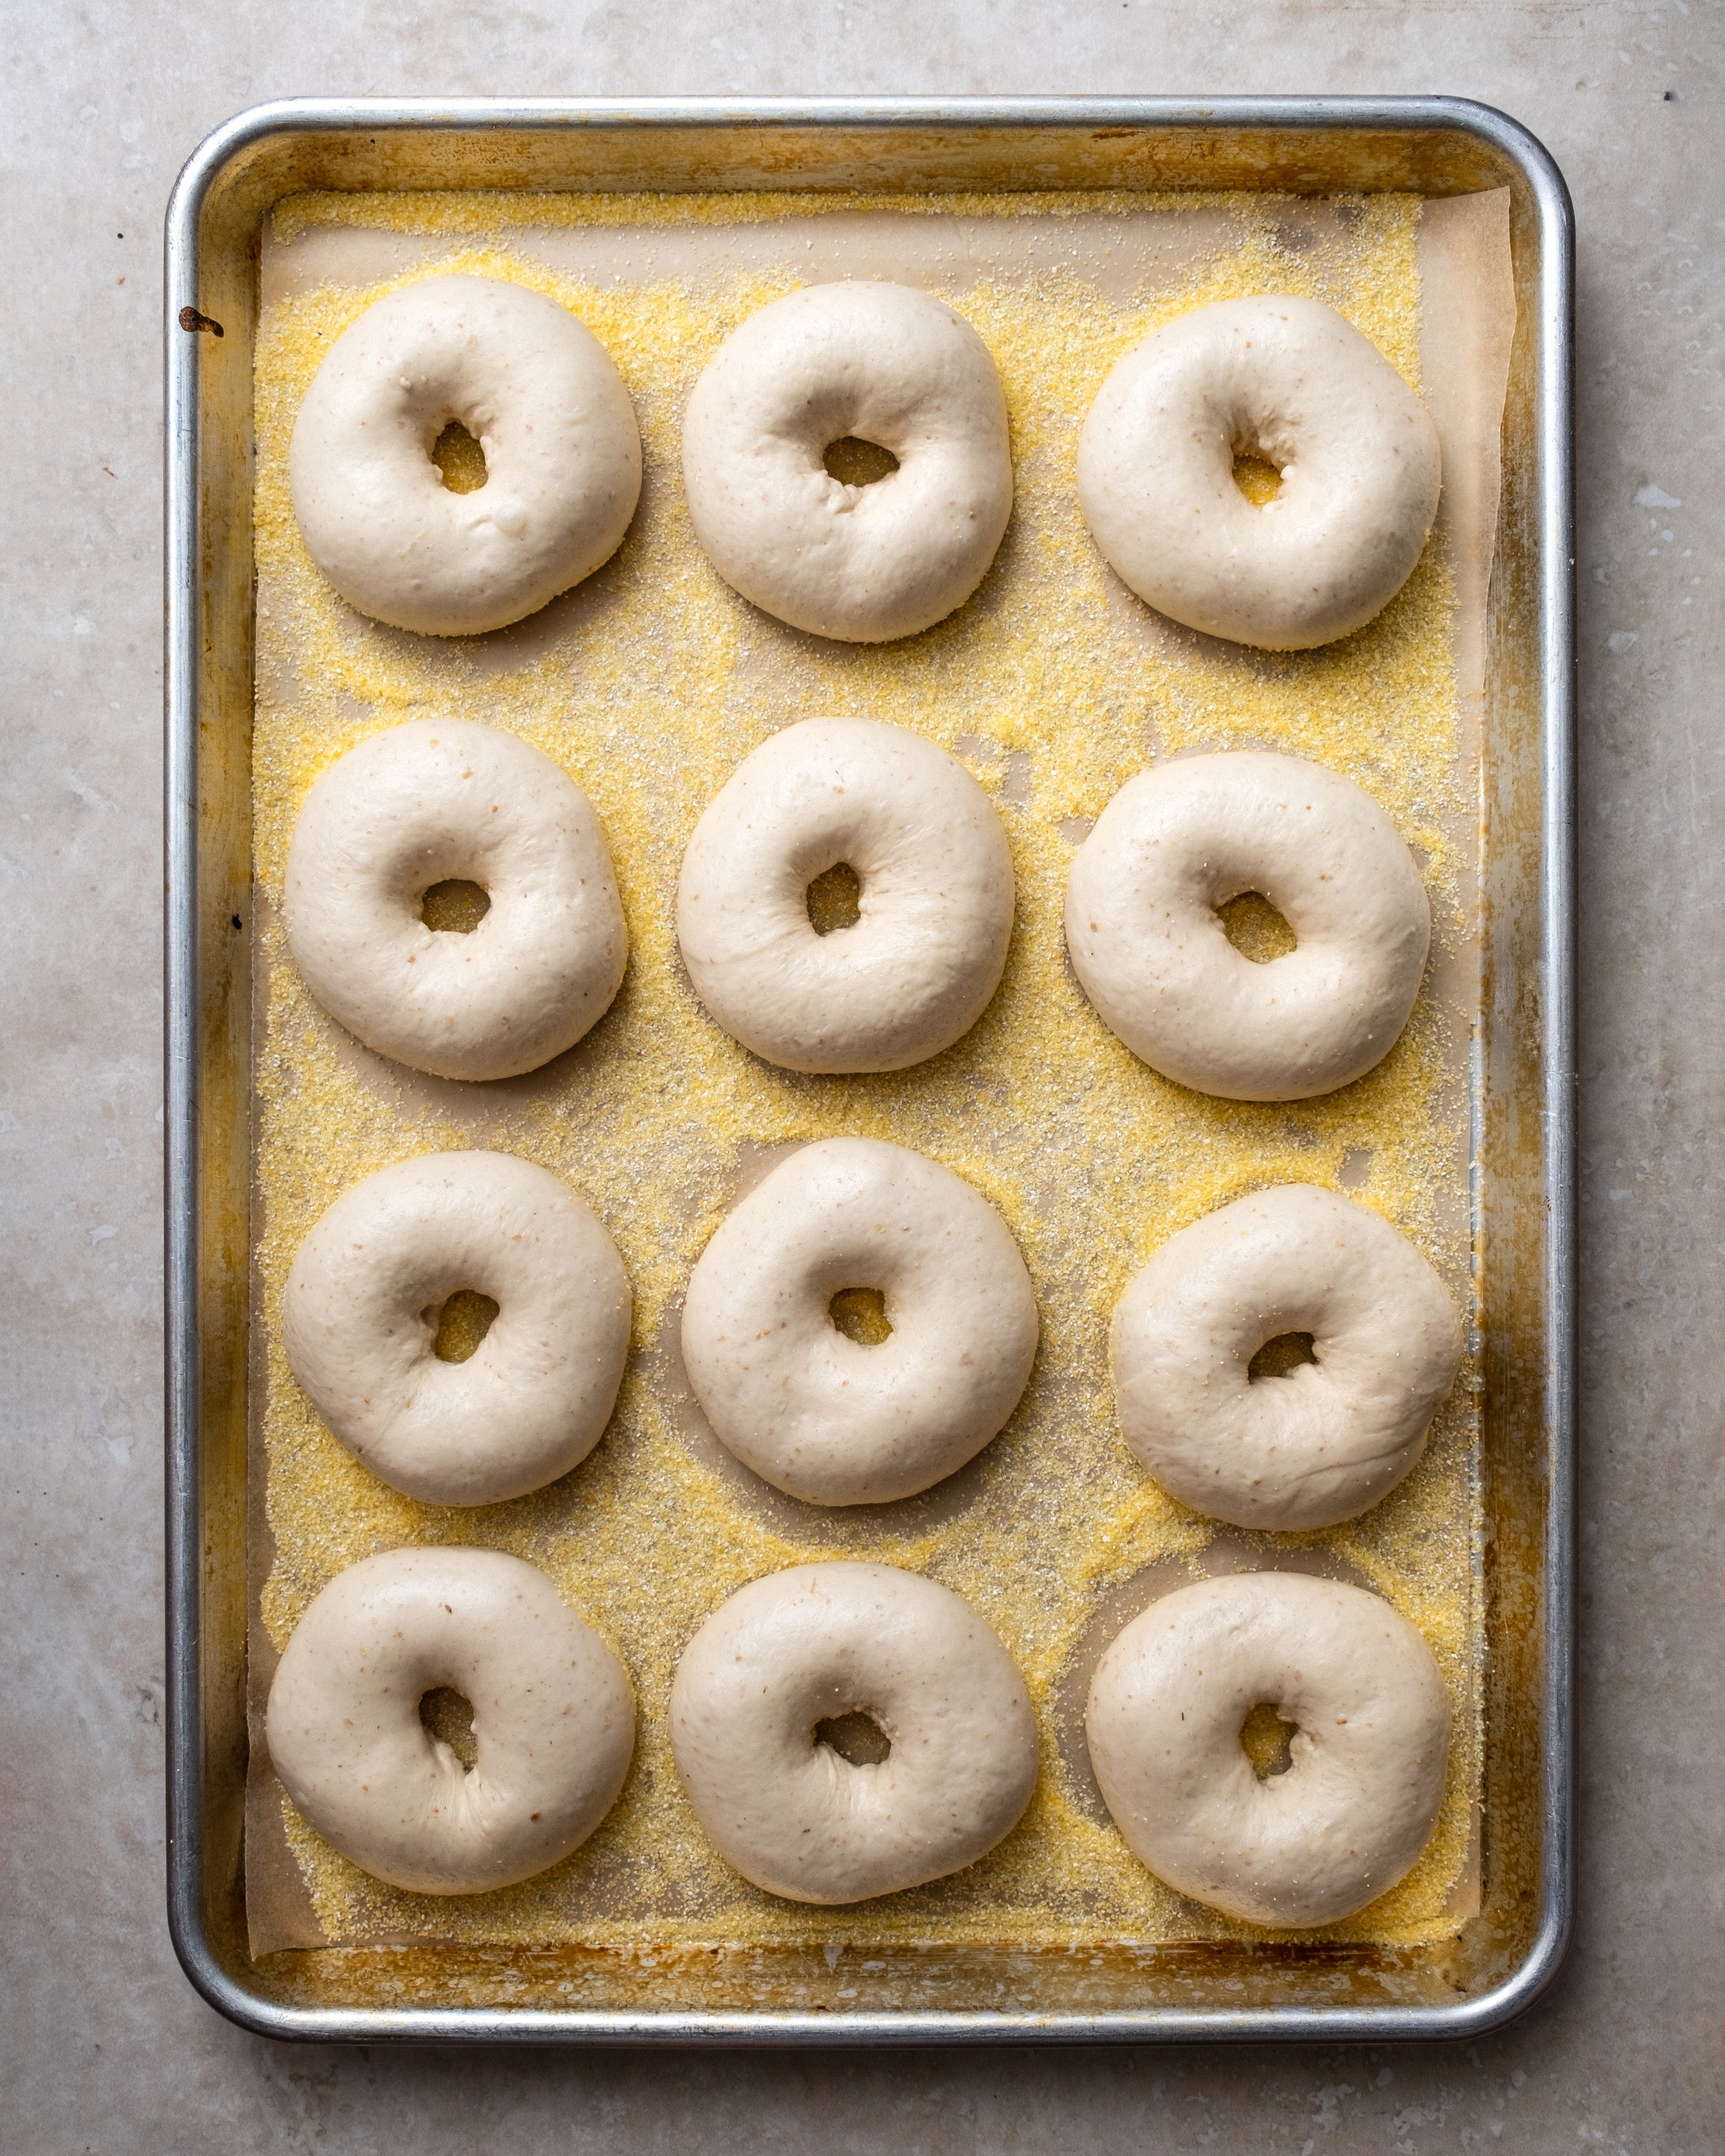
Remove the dough from the bowl and cut into 8 equal sized pieces. Form each piece into a ball, making sure the shaping creates a nice taught surface. Cover and set aside for 10 minutes. To form the dough into bagels you can either roll each ball into a rope and squish the ends together, rolling on the join to seal. The method I use most of the time is the poke-a-hole method. Place a ball of dough on the worksurface and press your finger into the middle of the dough, wiggling a little until you’ve pushed all the way through and can feel the worksurface. Spin the bagel around your finger a little to open up the hole then use your fingers to tease it wider. Make the hole a little wider than you think because it will spring back a little as you shape the remaining bagels and when the bagels bake the hole naturally gets smaller.

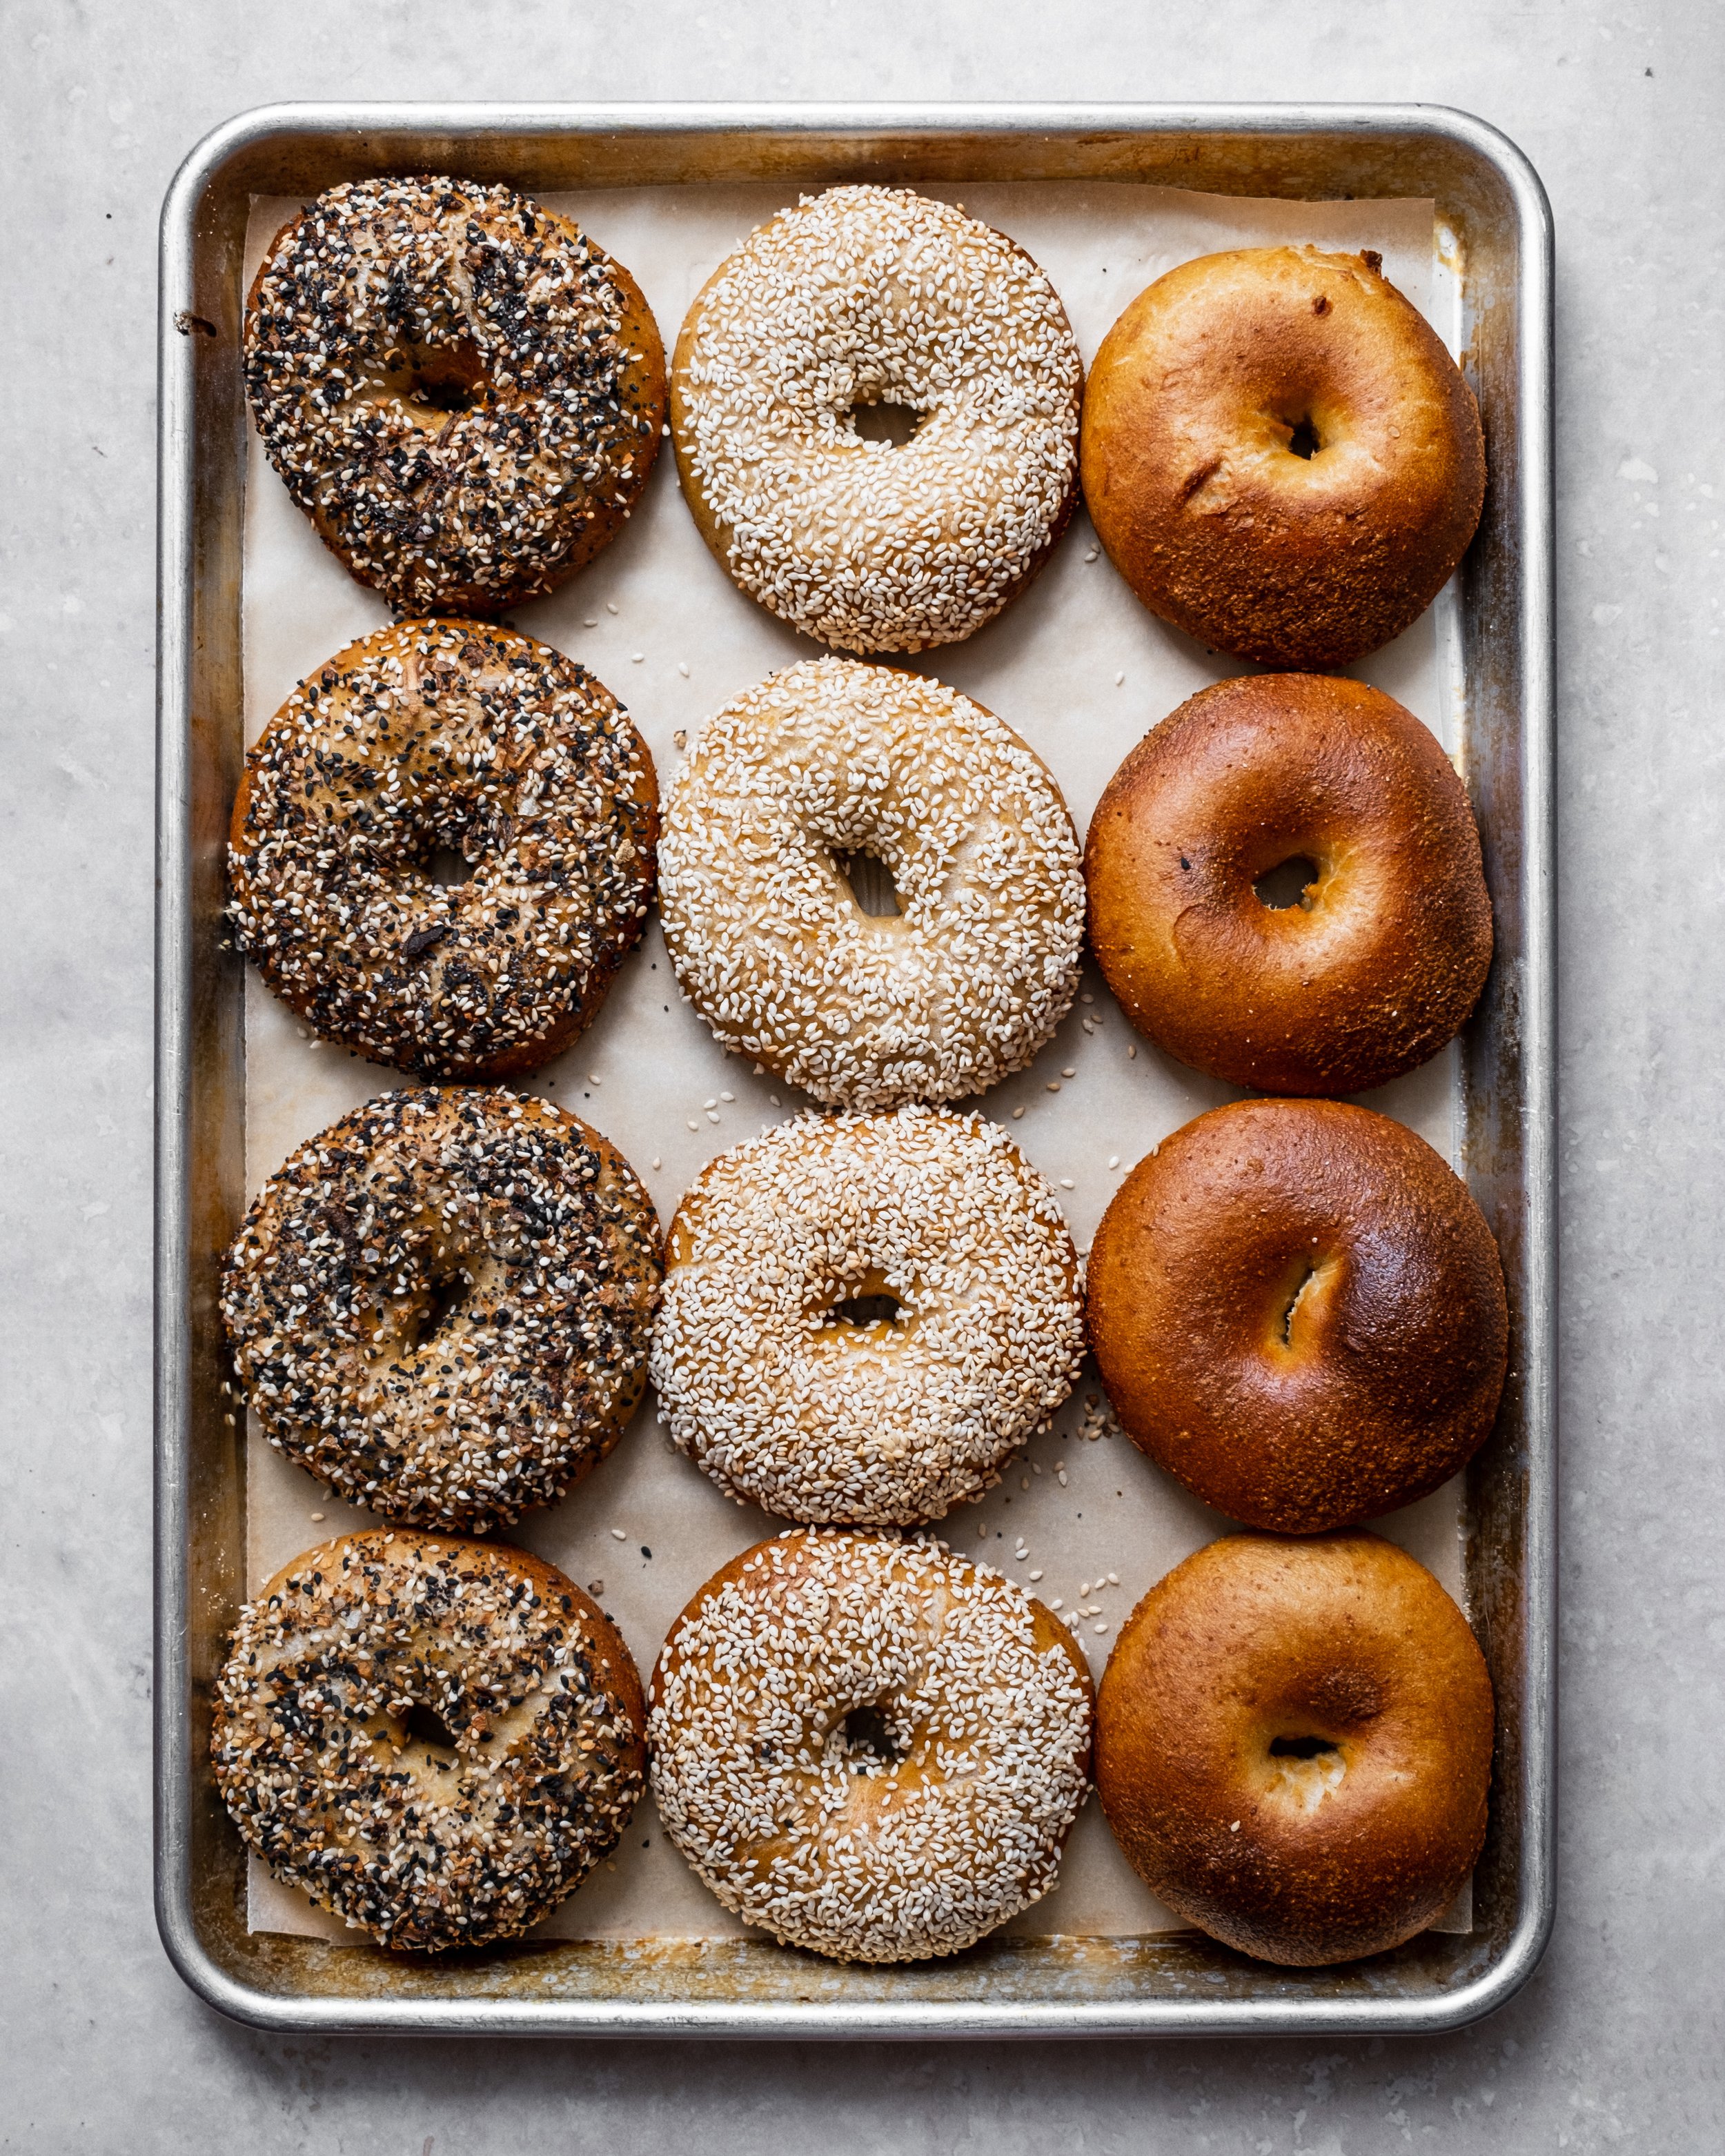
Place the shaped bagels onto a parchment lined baking tray that has been sprinkled with a thin layer of cornmeal, this helps prevent the bagels from sticking and makes then easier to manoeuvre later on. Cover the bagels and set aside for around an hour. The bagels won’t double in size you looking for them to looked a little puffed up.

A little before your bagels are ready for boiling and baking preheat the oven to 240ºC (220ºC). Line two baking sheets with parchment paper and prepare plates/bowls with any toppings you are planning on using. Fill a large saucepan with water and bring to a gentle boil. Add the malt syrup and bicarbonate of soda (it will foam up a lot but after a couple minutes will settle down).

If you want to test the bagels are ready for boiling and baking you can do a float test. Place one of the bagels into the boiling water. If the bagel sinks but floats within 5-10 seconds they are ready to go. If they stay sunk for longer leave the remaining bagels for another half an hour or so to proof a little longer.

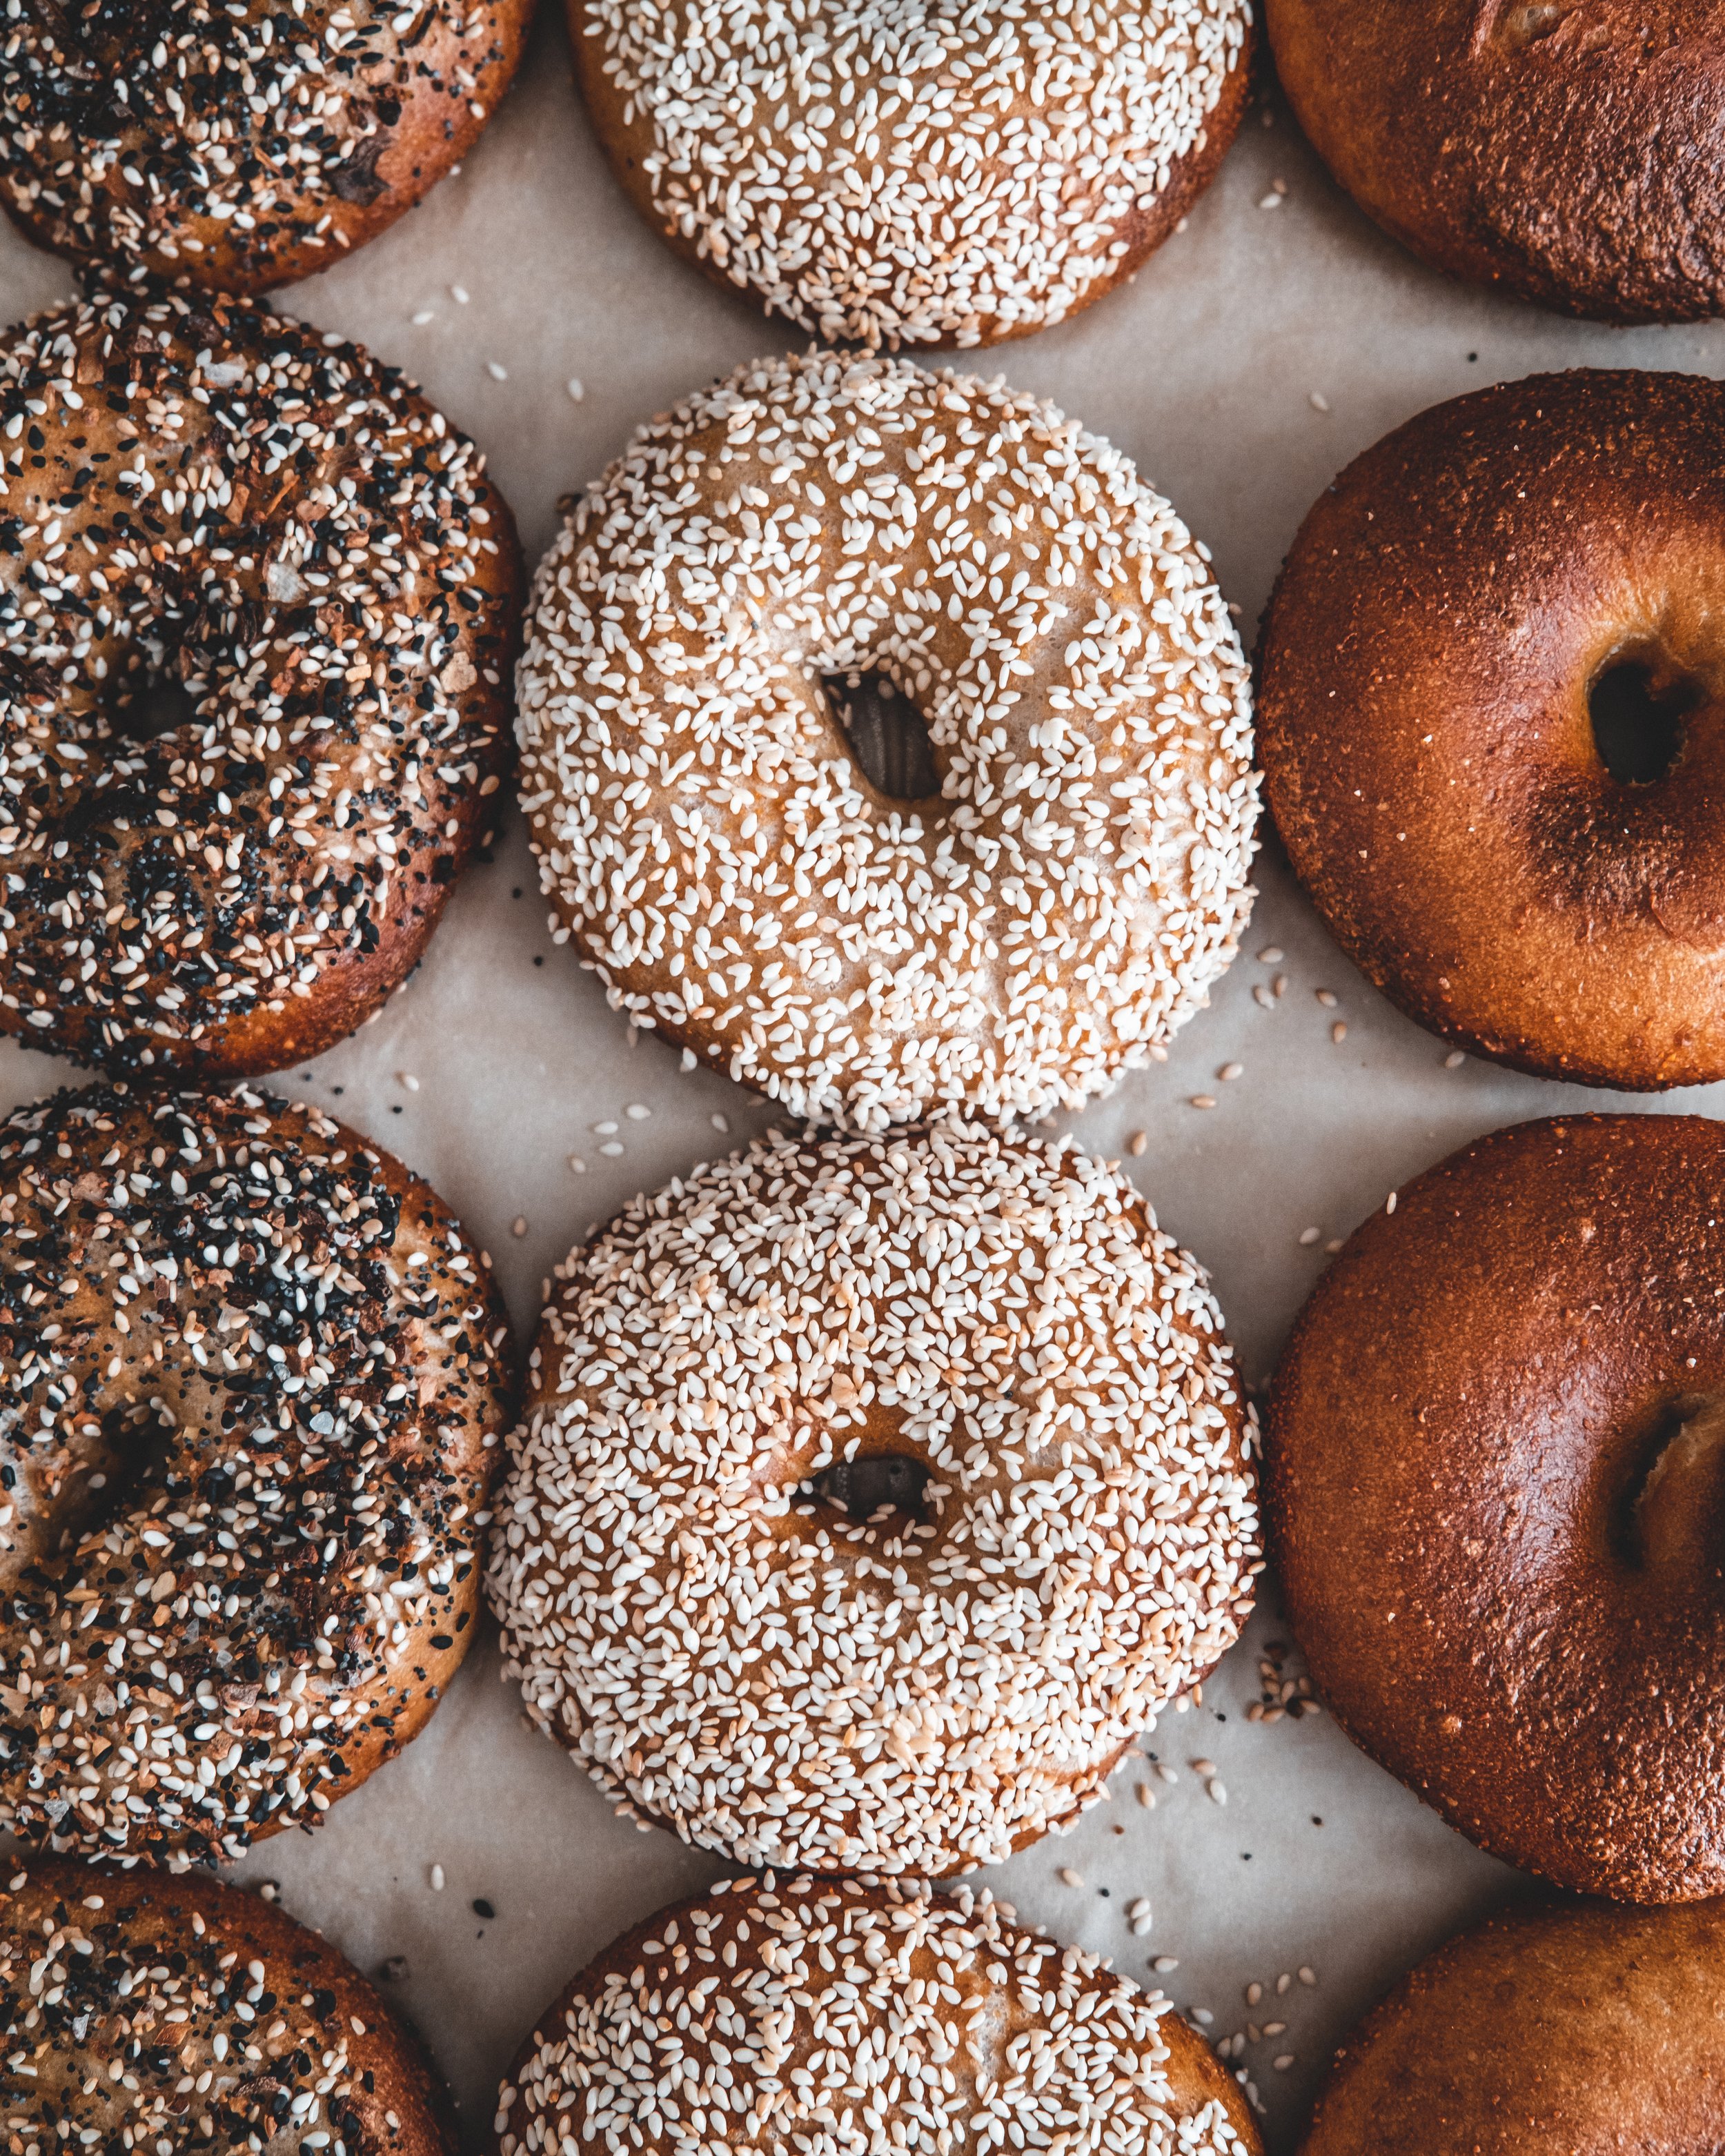
Add the bagels, 4 at a time, and boil for 30 seconds before flipping them and boiling for another 30 seconds. Lift from the water with a slotted spoon and transfer to the prepared baking trays. Repeat with the remaining bagels. After a minute or so, carefully lift the bagels and dunk them into your toppings, coating one side, before placing back onto the baking tray.

Bake the bagels for about 15 minutes or until golden brown. Remove and transfer the bagels to a wire rack to cool completely.

Bagels are best within a day or two of baking but they also freeze brilliantly for up to a month.

In Breads and Quickbreads Tags bagels, sourdough bagels, sourdough bread, sourdough, everything bagel seasoning, everything bagels, New York bagels, ny style
5 Comments

Blueberry Cake Doughnuts with Blueberry Bourbon and Basil Glaze

Edd Kimber May 9, 2022

How do you define a doughnut? You could argue its just fried dough but does that just mean a bread dough? What about cake batter, or choux pastry? Both of those can make great doughnuts, so what really does define a doughnuts? Maybe it’s one of those ‘hard to define but I know it when I see it’ kind of thing? Well, however you define a doughnut, today we are talking about one of the two major types, cake doughnuts. 

You can probably already tell from my use of doughnut instead of donut that I am a Brit and, here in the UK, cake doughnuts are not anywhere near as common as in North America. Bakeries known for doughnuts tend to go down the fried dough route. Of course a brioche doughnut, stuffed full of cream or jam is a beautiful thing but sometimes I want my doughnut craving fulfilled quicker and in an easier manner. The batter which cake doughnuts are made with takes just a couple minutes to make and there is no proofing required. If cake doughnuts are made well I also find they keep better than a brioche doughnut. Whilst all doughnuts are best served as close to frying as possible, these will keep for a day or two and still taste great.

The inspiration for these doughnuts is from Blue Star Doughnuts who make a doughnut with a blueberry basil and bourbon glaze. I took that idea and ran with it, not only does the glaze have blueberries in (paired beautifully with basil and bourbon) the doughnuts themselves are studded with them too. A quick note on blueberries, for this recipe I like to use frozen blueberries as it helps to prevent them turning to mush when mixed into the batter. I also like to use frozen wild blueberries. Wild blueberries have a better flavour and importantly they are very small. The benefit of small berries is that they don’t affect the structural integrity of the doughnuts when cut and fried. I have made them with regular frozen blueberries and they work fine, they just tend to look a little more irregular in shape.

Blueberry Cake Doughnuts
Makes 8

275g plain flour
1 tsp baking powder
1/2 tsp bicarbonate of soda
1/2 tsp fine sea salt
100g caster sugar
zest of 1 lemon
100ml buttermilk
4 large egg yolks
30g unsalted butter, melted and cooled
1 tsp vanilla bean paste
100g frozen wild blueberries

Blueberry Basil and Bourbon Glaze
50g blueberries
1 tbsp lemon juice
3-5 basil leaves
1 tbsp bourbon
Pinch of fine sea salt
1/4 tsp vanilla bean paste
200-225g icing sugar

Making these doughnuts is incredibly easy, so much simpler than a yeasted doughnut. To a large bowl add the flour, baking powder, bicarbonate of soda, salt, sugar and lemon zest and whisk to combine. In a small jug whisk together the buttermilk, egg yolks, butter and vanilla. Pour the buttermilk mixture into the flour mixture and, using a spatula, stir together to form a thick cake batter. Add the blueberries and briefly stir into the batter until evenly distributed. Don’t worry if the blueberries bleed a little into the batter, thats to be expected, and using frozen berries prevents the berries breaking down further as the dough is rolled out.

Line a baking tray with parchment paper and flour liberally. Tip out the cake batter and sprinkle liberally with flour. Using your hands or a rolling pin, press the dough into a 1.5cm thick layer. Transfer the tray to the fridge for abut 2 hours to form up slightly. 

To make the glaze add the blueberries and lemon juice to a small saucepan (a milk pan or butter warmer works perfectly here) and cook over medium heat until the blueberries are breaking down and the liquid is bubbling, cooking for a few minutes more to reduce the amount of liquid a little (this also concentrates the colour). Scrape the blueberry mixture into a jug and add the basil, bourbon, salt, vanilla and about half of the sugar. Use a stick blender to puree until smooth, then add more sugar until you have a thick but pourable glaze. You can adjust the thickness by adding a touch more lemon juice if too thick and more icing sugar if it is too thin. Cover while you fry the doughnuts.

Fill a large saucepan about 1/2 full with vegetable oil and over medium heat bring to about 160-170C. Once at temperature, turn the heat to low. You’ll want to have a thermometer handy so you can regularly check the temperature of the oil so you can adjust the heat as needed to keep it within the 160-170C range. 

Remove the doughnut mixture from the fridge and using a 3 inch round cookie cutter, cut out as many doughnuts as you can. Using a 1 inch round cookie cutter, remove a hole from the middle of each doughnut. You can fry the middles as doughnut holes and the scraps can be pressed back together, re-rolled and cut out as before to get a couple more doughnuts. 

Carefully lift the doughnuts into the oil and fry, 2 or 3 at a time, for about 2 minutes flipping halfway through cooking to ensure even browning. When the doughnuts are golden brown use a slotted spoon to remove them from the oil. The doughnuts should feel light, if they feel heavier than you expect they are likely undercooked and need a little longer in the oil. Transfer the doughnuts to a wire rack set atop a baking tray. Once all your doughnuts are fried pour over the glaze, covering as much as you can. Leave the glaze to set for 15-20 minutes and then enjoy!

Whilst doughnuts of any sort are truly at their best as soon as they are cool enough to eat, these cake doughnuts will keep for at least a day after frying. 


In Cakes Tags blueberry, donuts, doughnuts, bluestar donuts, bourbon, basil, cake, cake doughnuts, cake donuts, fried
2 Comments

Maple Baked Pears with Granola Crumb

Edd Kimber April 28, 2022

Sponsored by Lizi’s Granola

Do you need an idea for a super quick and easy dessert for when anything more involved sends you running from the kitchen? Well today I have just that recipe. The prep time is super quick, you can be curled up on the sofa with in a couple minutes with dessert taking care of itself in the kitchen. 

If you had a childhood at all similar to me, then baked apples were a regular dessert, served hot from the oven with lots of thick custard. Cored apples were filled with dried fruit and baked until squishy, almost to the point of collapsing. At the time I found the dessert boring but now something simple like this is pure comfort for me. For this version I have opted for pears and I don’t roast them for so long that they are devoid of texture, I like them tender but not so soft they could be baby food. And talking of texture, to add an extra layer of crunch and an extra layer of flavour, I like to serve these pears with a scattering of Lizi’s High Protein Nuts and Seeds Granola. The granola adds a ton of interest to a very simple dessert and makes it something a little fancier. This particular granola is made with pumpkin seeds, walnuts and almonds and sweetened with a mix of apple juice and black treacle for a wonderful flavour that goes brilliant on this dessert. To roast the pears I like to use maple syrup and butter plus a little spice in the form of cardamom, cinnamon and orange zest. Whilst these flavours are a little autumnal you can adapt them to suit whatever you are fancying in the moment. You can also make similar desserts with summer fruits like peaches and plums, serving it with a little drizzle of double cream or a dollop of creme fraiche.

Maple Baked Pears with Granola Crumb
Serves 4

4 large pears, ripe but a little firm
100ml maple syrup
50g unsalted butter, diced
4 cardamom pods
1 cinnamon stick
3 strips orange zest
50g Lizi’s High Protein Nuts and Seeds Granola

Preheat the oven to 190C (170C fan).

Peel the pears, cut in half and then scoop out the cores. Into a rimmed baking tray pour the maple syrup and place the pears, cut side down, into the tray. Add the diced butter to the tray and scatter over the cardamom pods, the cinnamon stick and orange zest. 

Bake the pears in the oven for about 25 minutes or until tender, turning the pears halfway through cooking. To test the pears are cooked, pierce with a knife, they should present almost no resistance. By the time the pears are cooked the maple syrup and butter should have formed a syrupy sauce. 

To serve place two pear halves into a bowl scatter over a couple tbsp of the granola and a generous drizzle of the sauce. Serve with a dollop of creme fraiche or sour cream

In Dessert Tags pears, baked pears, maple syrup, maple, granola, Lizi's granola, dessert, easy dessert
Comment
black and white cookies made with black cocoa powder and discs of white chocolate, sprinkled with salt

Inside Out Chocolate Chip Cookies

Edd Kimber April 20, 2022

It’s a bit of a rarity these days that I actually get to enjoy making other peoples recipes (something I am trying to do a bit more of at the moment, to bake in a way that is purely about enjoyment, without it becoming work) but for the recent Bake For Ukraine bake sale I wanted to take a new cookie for my menu but I didn’t have the time to really work on anything new so instead turned to my cookbooks to find something I thought might work. The idea I wanted to go for was an inside out chocolate chip cookie, a dark chocolate cookie dough with white chocolate chunks. In the back of my head, I thought the brilliant book Sister Pie had something similar and thankfully I was right.

The cookie from the book is known as a double (okay triple) chocolate chip cookie and I thought it could easily be adapted to fit my idea. In the book the cookie has a pretty quick turnaround, the dough is baked as soon as it is made, no resting, just instant gratification. The recipe looked good to me but I needed something I could prep in advance so I did a quick test. I wanted to be able to make the dough a couple days in advance and then bake it as close to the bake sale as possible. I could either scoop the dough once chilled, as I often do with my cookie recipes, or I could roll it once made and chill it in individual portions. The chilled dough sets very firm so scooping or rolling it wasn’t an option so instead I opted to make it slice and bake style. This is pretty unusual for this type of cookie, normally being a technique you would use with something more akin to a shortbread. This technique also led to an interesting development when it came to flavour. When the cookies were sliced, and because I was using large discs of white chocolate, there was lots more chocolate peeking through the two sides of the cookie than when I made it according to the recipe. This had an unexpected benefit, the chocolate on the base of the cookie caramelised as it baked, meaning the flavour was a little less sweet and with more of a caramelised flavour, a double winner if you ask me.

If you want a cookie that has a sweet and salty contrast with just a hint of an oreo flavour, this recipe is for you. The edges become nice and crisp and the centres become the ideal form of chewy, this is a winner of a recipe and one I will surely make time and time again. 

Inside Out Chocolate Chip Cookies
Adapted from the book Sister Pie by Lisa Ludwinski

225g dark chocolate, roughly chopped
115g white chocolate, roughly chopped
225g plain flour
60g black cocoa powder*
1 1/2 tsp baking powder
1 tsp bicarbonate of soda
1 1/2 tsp fine sea salt
225g unsalted butter, room temperature
150g caster sugar
150g light brown sugar
2 large eggs
250g white chocolate*

*To achieve the intense black and white look the these cookies have you need to use black cocoa powder, a sub category of dutched cocoa powder. This type of cocoa powder is very easy to buy online (I use the brand DeZaan) but if you cant find it you can use traditional dutched cocoa powder, the look just wont quite be the same. The black cocoa is also what contributes to that hint of oreo flavour. For the white chocolate I like to large chocolate discs but if you only have access to bars chop them into irregular sized chunks and avoid using white chocolate chips. 

To make the cookie dough place the two types of chocolate into a bowl set over a pan of simmering water and heat, stirring occasionally, until fully melted. Remove from the heat and set aside for 10 minutes to allow to cool. 

In a large bowl, whisk together the flour, cocoa powder, baking powder, bicarbonate of soda and salt. If using the black cocoa a good whisk should be fine as the black cocoa is lower in fat and doesn’t tend to clump. If using a regular dutch cocoa you may want to sieve this to ensure a lump free mixture. In a large bowl, using an electric mixer, cream together the butter and sugars, beating until light and fluffy, about 5 minutes. Add the eggs one at a time, beating until fully combined before adding the second. Pour in the cooled chocolate mixture and mix until the batter is uniform. Add the flour mixture and on low speed mix together just until a dough is formed. Add the second amount of white chocolate and mix until evenly distributed.

Scrape half the dough onto a large sheet of clingfilm and form into a rough log. Roll the dough in the clingfilm and use your hands to roll into a log that is about 2 inches thick. The dough is soft at this point so the shape wont be perfect. Transfer the log of dough to the fridge and repeat with the second half. Once the dough has had a little time to chill and firm up I like to take it out of the fridge and roll it to refine the shape and make it more evenly round. Chill until firm and ready to use, the dough will keep for about 3-4 days before baking. 

To bake, remove the dough from the fridge and allow to sit at room temperature whilst your oven preheats to to 180ºC (160ºC Fan). Line two large baking trays with parchment paper. 

Using a very sharp knife cut the cookie dough into pucks about 1 inch thick (the cookies should weigh around 60g each, I like to weigh my first cookie puck to ensure I am cutting them the right size). You may find the cookies break into pieces when sliced but don’t worry just press them back together and the’ll be fine. Place 6 cookies onto each of the prepared trays, spacing well apart as they spread. Sprinkle the cookies with a little flaked sea salt and bake in the oven for about 15-16 minutes. They’ll still be soft when they come out of the oven and will set up as they cool. 

After a few minutes transfer the cookies to a wire rack to cool completely. Repeat with the remaining cookie dough. 

Kept in a sealed container these will keep for 2-3 days. The dough can also be frozen for up to two months before baking. 


In Biscuits and Cookies Tags black cocoa, inside out, white chocolate, cookie, cookies, sister pie, double chocolate
2 Comments
  • Recipes
  • Older
  • Newer

Twitter

  • Was 8 original films, 3 spin off films, a two part play not enough. Can we have something new. https://t.co/cBZdGEGeyv
    Apr 4, 2023, 1:46 PM
  • RT @deliciousmag: Cacio e pepe, but make it buns! These seriously cheesy bread rolls from @TheBoyWhoBakes are inspired by his favouri… https://t.co/oDZlaDgnN2
    Apr 2, 2023, 11:08 AM
  • RT @TheDailyShow: Congrats to Donald Trump on finally winning a majority of votes! https://t.co/ezP55HZgl0
    Mar 31, 2023, 12:43 AM

Instagram

This weeks bonus recipe, for subscribers to my newsletter, is this gorgeous sour cherry and coconut gateau basque. The crust is a buttery cross between pastry and cake, think a cakey cookie. The filling is a layer of sour cherry topped with a rich coconut custard. A real fun one to make too! Link to my newsletter can be found in my bio - #gateaubasque #pastrycream #coconut #sourcherry
In this months @olivemagazine (out today) the team came and photographed my petit kitchen and we talked about how we put our stamp on the place, without spending a fortune. We hated the bland kitchen that we inherited but, as it was relatively new an
In this months @olivemagazine (out today) the team came and photographed my petit kitchen and we talked about how we put our stamp on the place, without spending a fortune. We hated the bland kitchen that we inherited but, as it was relatively new and in good condition, it felt a waste to rip it out and we also didn’t want to spend the money it would take to rip out the whole thing and replace it (it’s a howdens shell so we could have done something cheaper like @plykeakitchens @holte.studio @madebyhusk) so instead I painted all of the cabinets, using @makeitrustoleum kitchen cabinet paint, to give it some personality and lighten the whole thing. Check out the magazine for the full run down. - #kitchendesign #kitchenremodel #rustoleumcabinettransformations #rustoleumkitchencupboardpaint #kitcheninspiration #theboywhobakes #olivemagazine
Are you making scones all wrong? Maybe, maybe not? But I do want to show you how I make them! This recipe is based on the method I learnt at @belmondlemanoir 12 years ago when I did a stage, and it makes the absolute lightest scones. And shock horror, it involves kneading the dough, albeit very lightly. You can get the full recipe in this weeks newsletter (free) linked in my bio. - #scones #bakingday #worldbakingday #afternoontea #hightea #englishscones #clottedcream #creamtea #theboywhobakes
facebook
  • Contact

The Boy Who Bakes

Edd Kimber

facebook